

Wow, just read through the entire thread and wowsers that is some great stuff in there. I cannot help but feel jealous of your talent
BoLS Lounge : Wargames, Warhammer & Miniatures Forum
Results 491 to 500 of 503
Thread: Sukigod's Ork Waaagh! Log
-
06-19-2014, 09:23 AM #491Occuli Imperator

- Join Date
- Jul 2009
- Location
- Mercia
- Posts
- 18,062
 Fan of Fuggles | Derailment of the Wolfpack of Horsemen | In girum imus nocte et consumimur igni
-
06-19-2014, 09:49 AM #492Battle-Brother
- Join Date
- Oct 2013
- Location
- Leicestershire, UK
- Posts
- 39
those Squigs are totally awesome! More events need to have prizes like those!
-
07-07-2014, 05:57 PM #493Chaplain
- Join Date
- Aug 2009
- Location
- Central MN, USA
- Posts
- 370
Thanks all for the kind words on the plushie squigs! They were a big hit and competition was fierce.
Got some precious time on the bench lately and didn't want to dig into the monotony of the blasta bomma and wanted something a little mrope detail oriented. Since Mekboyz are the new orky priests, I figured I'd finish off the two I've had hangning around my bench for the last year.
Here's some KMB Mekboyz to throw into the odd mob
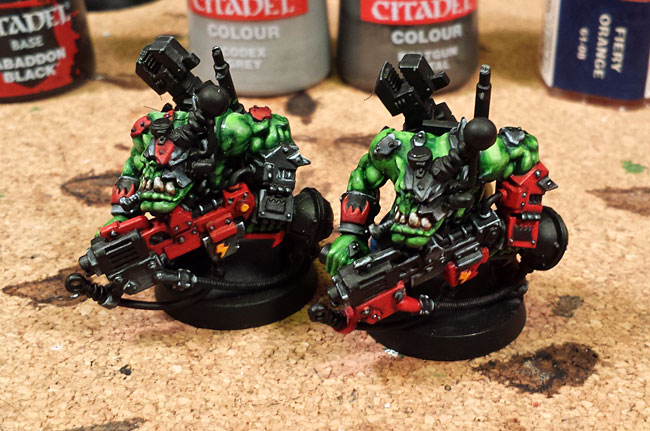

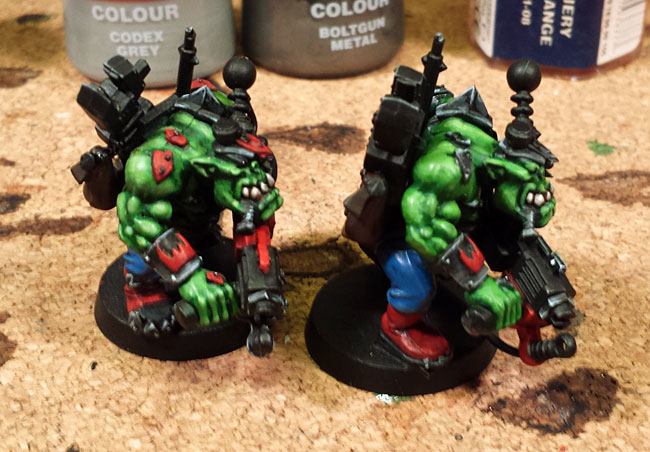
Just gettting back in to the swing of things so the edging is a little rough - it's been a while! Still working on improving a sort of NMM, and I admit, I'll be chickening out when it comes to the brass sections - I'm just not ready to tackle returning and learning a new color progression. Lots of little details that are fun to work on with these boys, a great distraction.
Later!http://www.bigshoota.com
http://www.waaaghfest.com/
-
07-08-2014, 02:46 AM #494Veteran-Sergeant
- Join Date
- Jun 2014
- Posts
- 129
Just had a skim trhough some of the older posts. My hat goes off to you sir. Some fantastic work in this thread!
http://www.celestial-lions.net - witness my insanity
-
07-08-2014, 10:08 AM #495Brother-Captain
- Join Date
- Dec 2010
- Location
- Belgium
- Posts
- 1,058
Yeah, gorgeous Orks as usual, mate.
Blood Angels Army Project
http://www.lounge.belloflostsouls.net/showthread.php?t=12017
-
09-22-2014, 03:38 PM #496Chaplain
- Join Date
- Aug 2009
- Location
- Central MN, USA
- Posts
- 370
Thanks all!
So, I've been chipping away (hehe) at the paint job on the blasta bommer. I was almost finished with the initial outlining of the metallics when I realized I hadn't added any larger painting details like the checks or glyphs so I decided to knock that out. And guess what? I made a tutorial for ya all!
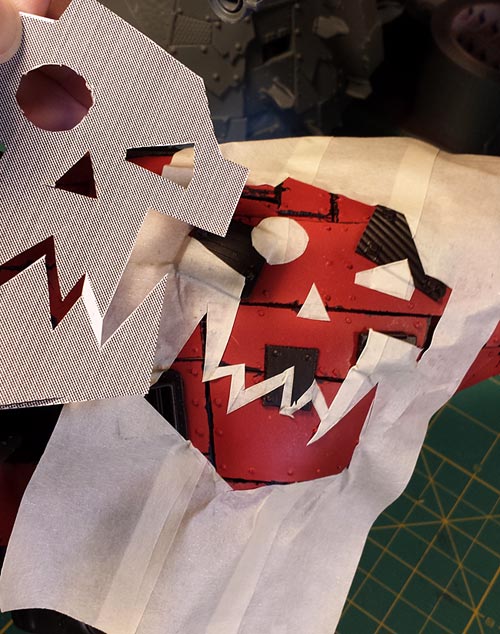
This technique is pretty much identical to the Skyshield Landing pad demo I did a while back but not as complicated or clean. I make a large format stencil out of rows of masking tape for the larger area. I could have used frisking paper/plastic but I don't have any on hand so when with what I did have.
I printed the glyph to scale, leaving a little bit of paper to keep the two parts together for tracing, easily filled in when penning the outline on the tape.
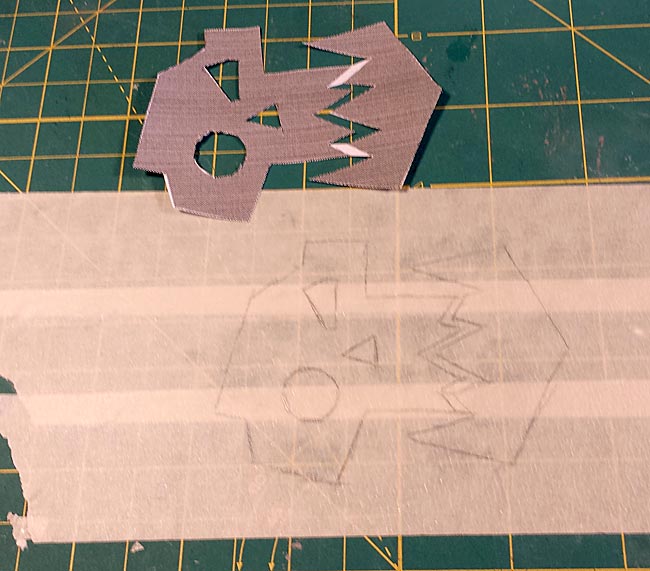
(sorry for the blur) Here I've trimmed out what will be the painted areas.
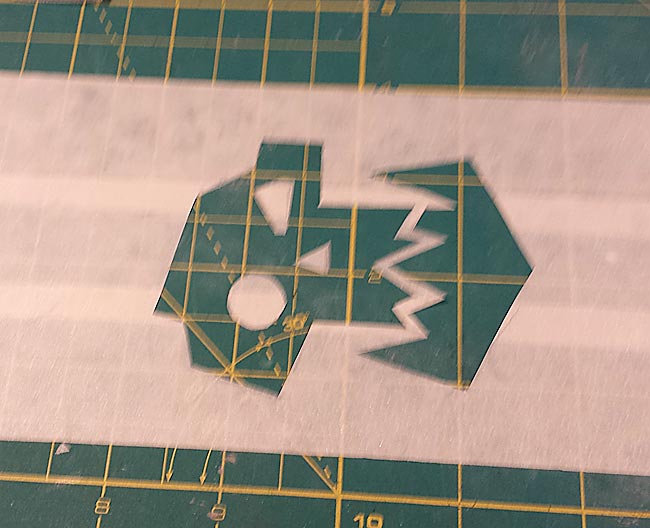
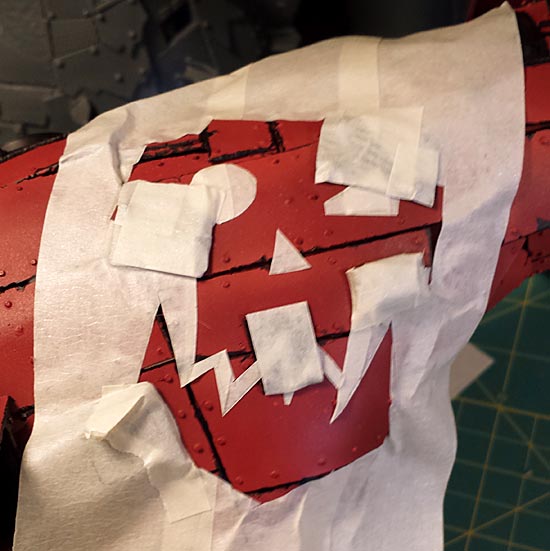
I CAREFULL lifted the tape stencil from the self-healing cutting mat. Take your time with this as masking tape tears easily, especially in thin areas. I use the original template to help align/place the interior mask parts.
Since I've already blacked out the metallics, I want to keep them from being painted so I went back and taped over the black areas with small cutout pieces of tape.
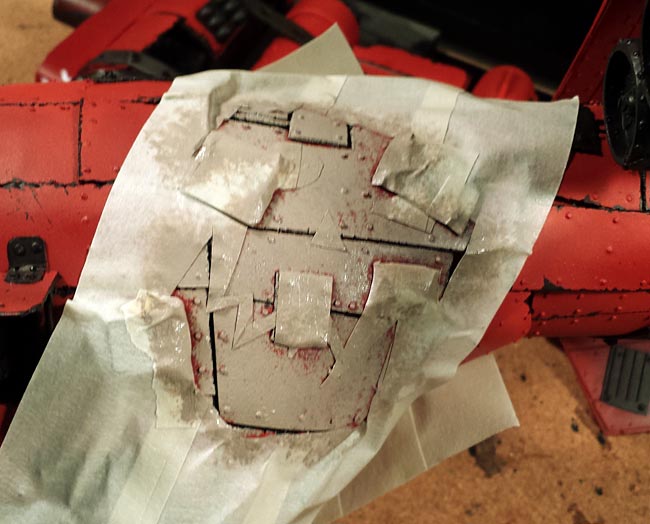
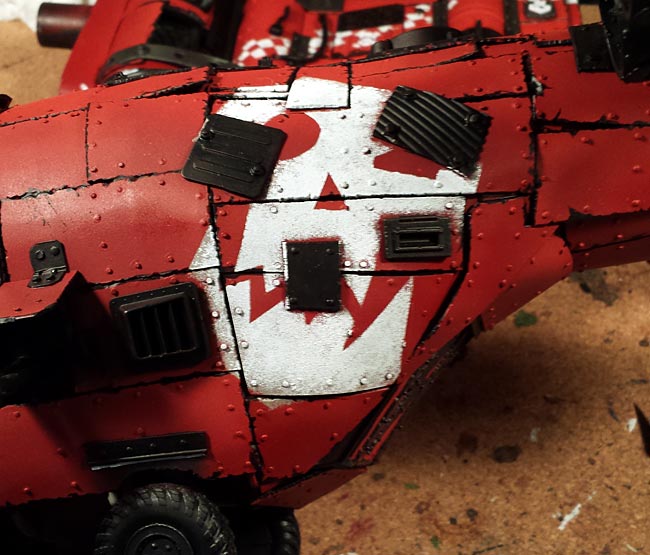
My first color is GW Rakarth Flesh, this simulates multiple layers of wear (from white). I'll play things pretty loose around the outside edges to help push home the look of weathered paint. This is applied with a sponge, dabbed straight up and down to the model.
Next up is Ceramtie White, again, sponged on. This time I concentrated the paint in the middle areas so the Rakarth Flesh shows at the edges, underneath the white.
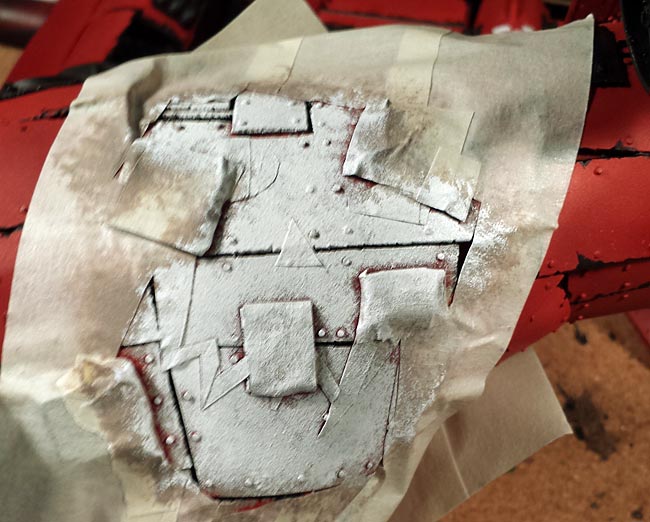
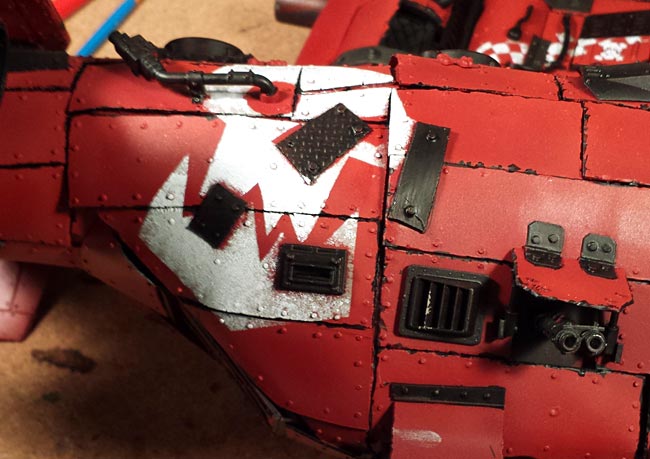
After the paint has dried, carefully peel off the masking tape.It's not perfect and I'll have to touch up some of the black areas before doing the metallics, but this is the nearly end result.
 http://www.bigshoota.com
http://www.waaaghfest.com/
-
09-26-2014, 12:41 PM #497Chaplain
- Join Date
- Aug 2009
- Location
- Central MN, USA
- Posts
- 370
.CONT
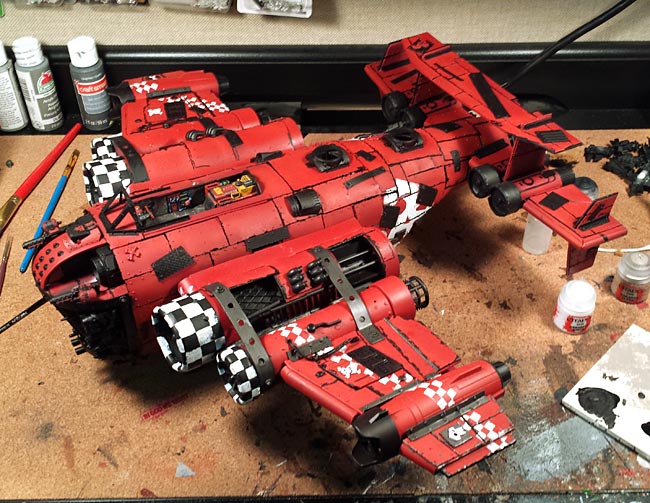
Now I've got some extra detail painted on to help break up the wide expanse of red. There's going to be quite a bit of metallics when I'm done and I don't want it to be tooo busy to the eye. I know ork's is usually that way but I like people to be able to focus on it
I've cleaned up the black basing areas and just need to put down a one or two metallics before wishing this beastie.
Later!http://www.bigshoota.com
http://www.waaaghfest.com/
-
08-19-2015, 09:21 PM #498Chaplain
- Join Date
- Aug 2009
- Location
- Central MN, USA
- Posts
- 370
So I'm back in the saddle for a time, we'll see how long it goes
I've actually been working on and off on this monster for about three weeks and the only thing I've accomplished has been the metallic weathering. I know, not much to weathering, right? Egggad, I wish. For anyone who saw the tutorial a few years ago about my weathering using the Skullhamma's, you'll know it's a long and tedious process. Sponged base/primer layer, then all hand done (with various size brushes) metals so they all stay nicely within (or trying to) the boundaries of the worn primer.
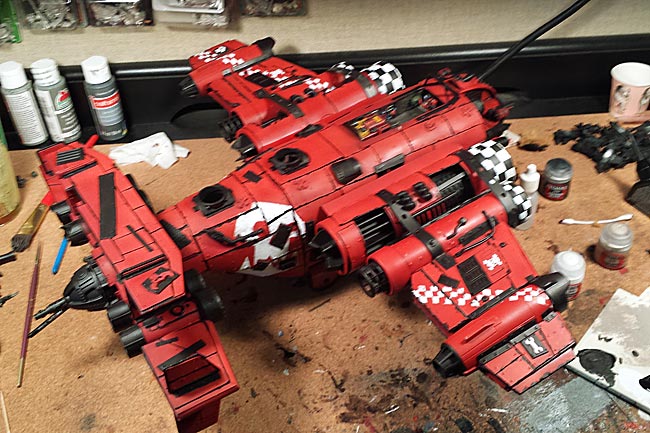
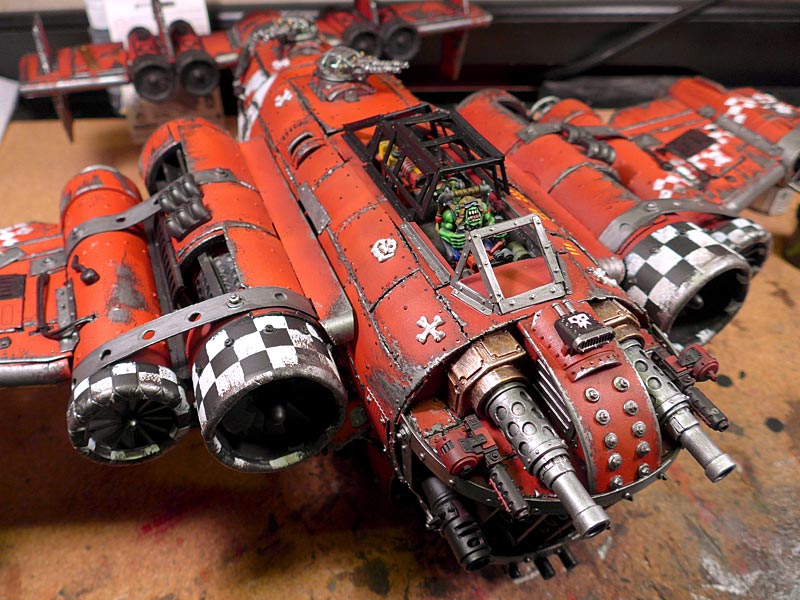
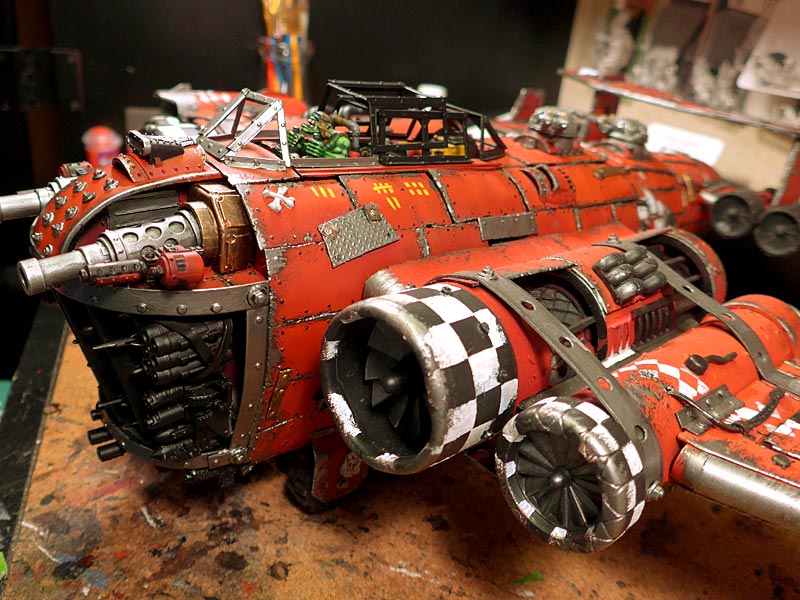
I'm done with the weathered metallics and done the brassy pieces and the main guns in the Deff Arsenal. I put it together for show since I haven't seen it in one piece in about a year. It is coming together now and I can finally see some sort of light at the end of the tunnel. Lots of smaller details like the exhausts, canopy, rear engine nacelles (black/white checks), bombs, and the Deff Arsenal. Then it's back to washes for grime, an airbrush for smoke/exhaust smoke stains - a brief touch up on details to bring them back out from washing - then sealing. I'm really hoping to have this giant wrapped up by Halloween. We'll see how that goes
ps. I know there's some shots without the main Deff Arsenal kannons - they were in the process of being painted when I took these. That also accounts for some barrel droop in some photos as well, they're only blue-tac'd on at the moment.
Later!
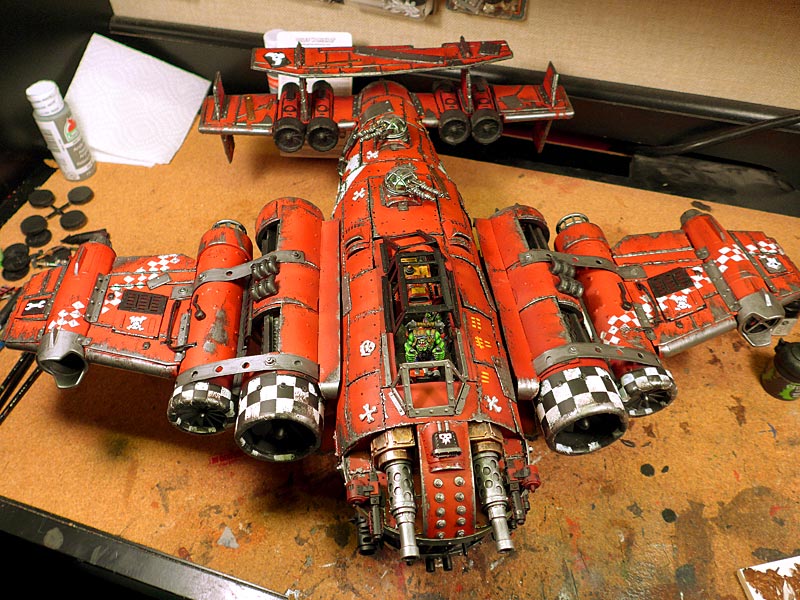
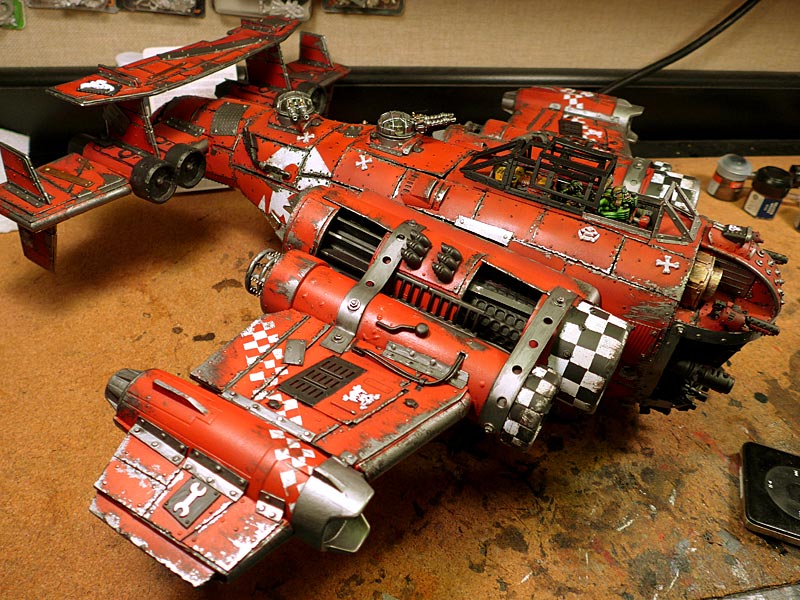
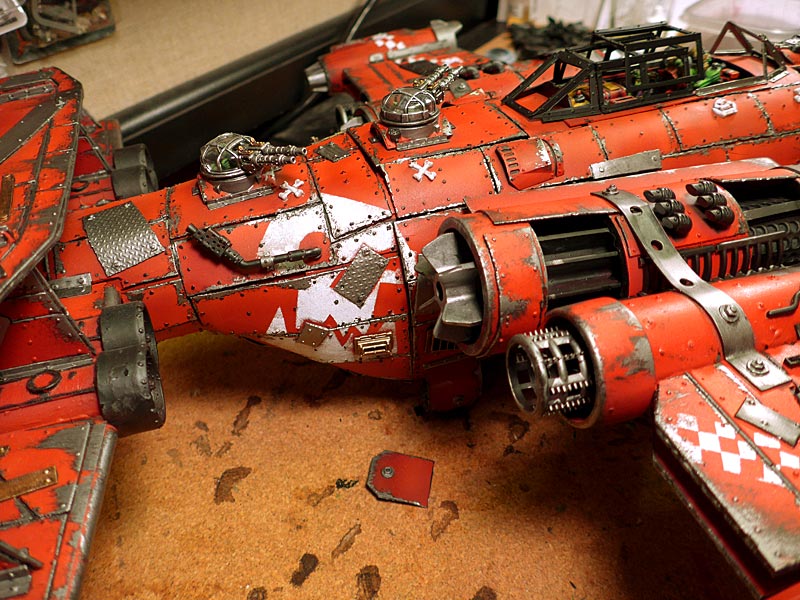
And a couple of Barry shots - one shown against a dakka jet.....
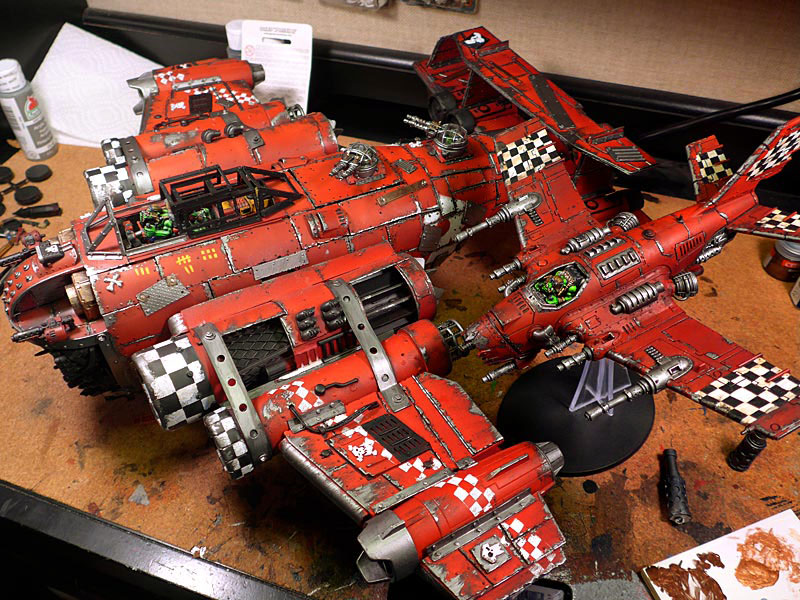
And a different kinda Barry shot
 http://www.bigshoota.com
http://www.waaaghfest.com/
-
08-29-2015, 09:24 AM #499Brother-Captain
- Join Date
- Dec 2010
- Location
- Belgium
- Posts
- 1,058
Dude... it looks jaw-dropping awesome! It's an amazing sight to see.
Blood Angels Army Project
http://www.lounge.belloflostsouls.net/showthread.php?t=12017
-
11-22-2015, 12:02 PM #500Chaplain
- Join Date
- Aug 2009
- Location
- Central MN, USA
- Posts
- 370
Boom!
We'll see how long this lasts
A long time ago in a house about 5 miles away, I started a green project, but of a different kind. It's a Bride of Frankenstein and The Monster kit that my wife wanted me to do up (she's a huge Bride fan). Looking for something to while the time away and brush up on my painting skills before returning the mighty green horde, I revisited this awesome kit to test myself.
Earlier I worked on the clothing for both as it was pretty easy. I was hesitant to work on the faces for a few reasons. One, the scale is MUCH larger than our standard 28mm figures. Second, I knew I'd need to do some larger area blending and wasn't sure how to go about it. In the interest of pushing myself, I dove in last night and figured I could always strip and reprime if I screwed it up too badly.
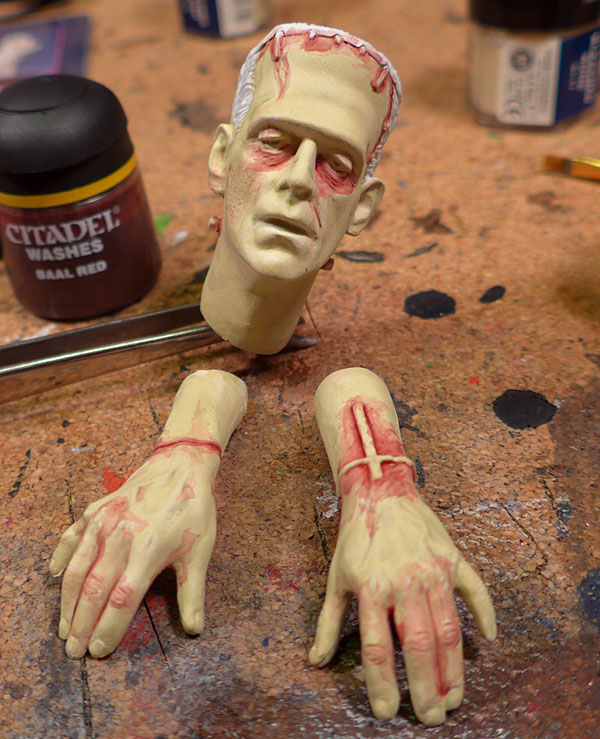
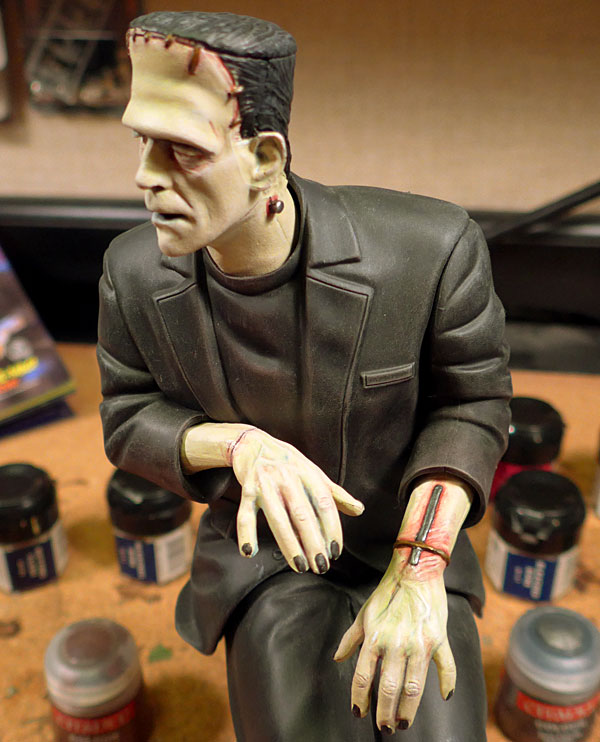
So, in my usual fashion of step by step (when I remembered to take photos, that is), here's how I did Frankie's head and hands.
The head and hands were primed white, then I applied a base coat of Bleached Bone and a thin covering of Rotting Flesh - (first two photos). I wanted a light, almost ghostly pallor to his skin, I wasn't looking to go all super-green, comic style monster. The green should almost be a rotting, under the skin appearance so I didn't mind of the lighter Bleached Bone showed on the high points as I was planing on wet brushing back up to create highlights later.
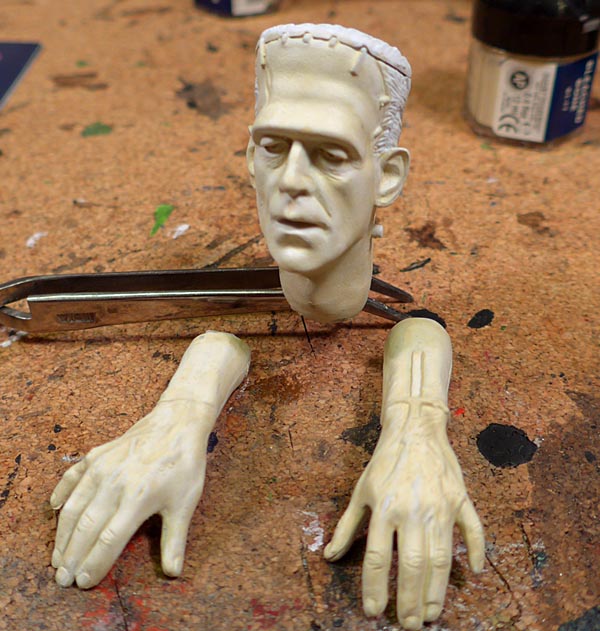
To achieve a bit of a sore, bruising effect around the stitching/attachment points for the various body parts (you would think they'd be a bit sore), I used Baal Red wash from GW. This was built up in a multiple layers, each one adding more color closer to the gaps and the deepest recesses under the eyes and around the rope/metal bar holding the left wrist together. (looks a little painful, doesn't it?) Yes, the application is a little sloppy at this point but I know I was going back over with the Rotting Green and Bleached Bone to blend it back in. This also achieves a bit of an underpainting technique, tinting the skin form underneath.
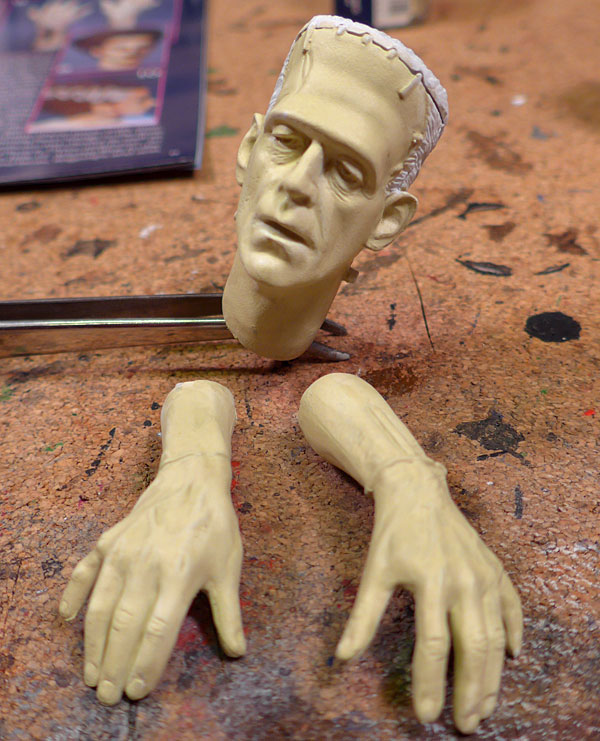
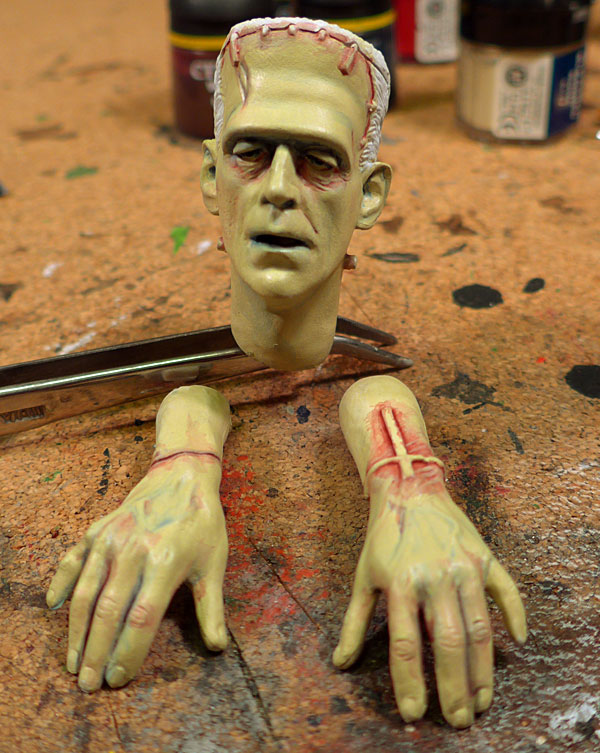
I now moved onto the blues. This was applied around some of the veins in the hands, under the chin, mouth, nostrils, and under the brow. The blue creates a much more subtle shadowing under the brows that simply using black. There's a small touch of Baddab Black wash in the deepest recesses of the mouth, nostrils, and underbrow/eyesockets. Things are a little rough, bit the wet brushing stage helps bring it all together.
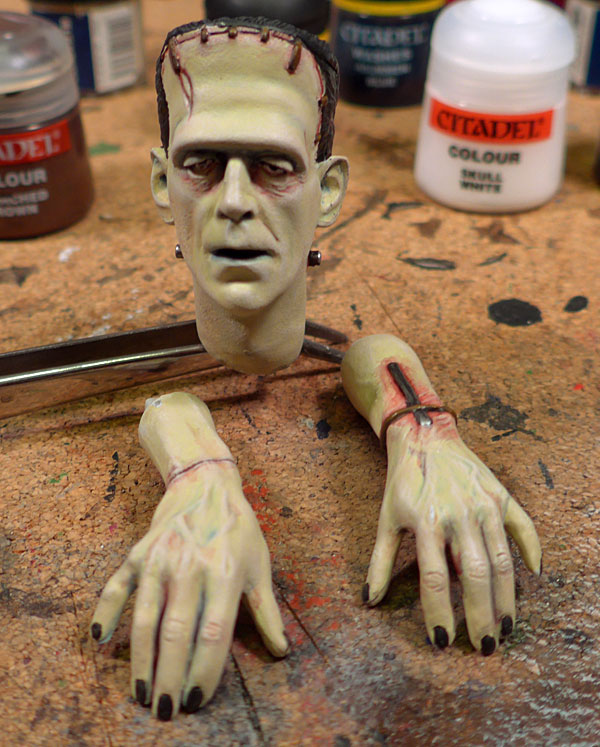
So, here's where I got dug in and was so in the flow I didn't take many pics. Here's what's happened since: I wet brushed Rotting Flesh, then a wet brushing of Bleached Bone to bring back the highlights and blend the bruising effects together. I also did a very light wet brushing of Skull White to the very highest points (brow, nose, cheekbones, knuckles, etc). This gives a little extra pop and adds depth without having to darken the recesses excessively. I also did the fingernails, rope and bar, hear, and leather stitching holding his skullcap on.
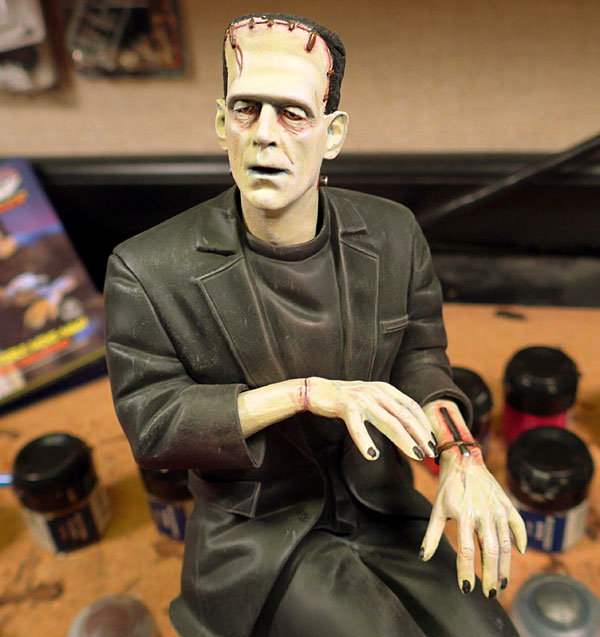
Here's the completed Frank figure with his head and hands in the right place
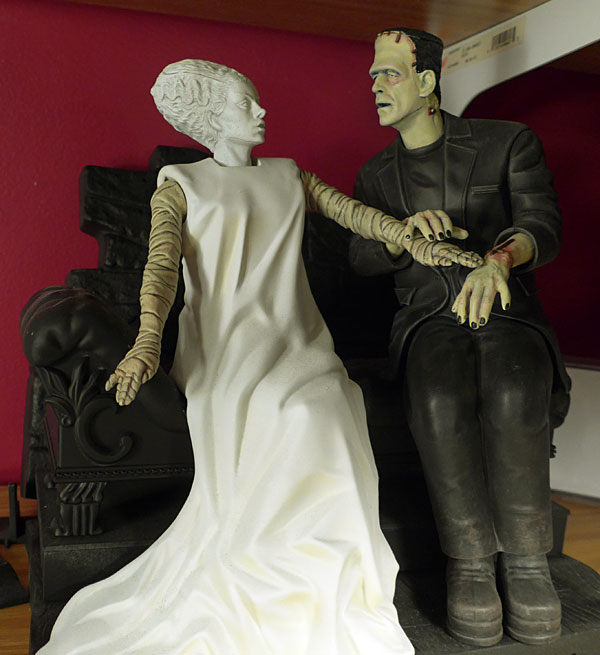
And a quick shot with his honey - Her dress and arms are done, still waiting for the courage to start her face. There's also a settee, floor, stone wall background and assorted lab equipment to paint up but those will be fairly easy and quick. I'm excited to work on the settee and stone as I've read up on some new techniques I want to try on them.
Till next time!
Later!
and yes, I'll be returning soon to the bomma - just need to finish the Bride and Frank first.http://www.bigshoota.com
http://www.waaaghfest.com/

 Reply With Quote


