

Alrighty, after a long pause it's time to continue. I've got so much in the pipeline but seeing as this project is closest to being finished, it deserves to be.
It's just some small odds & ends really, and first up is the Storm Bolter.
I was tempted to paint the magazines fully in another colour but them it seemed it might look a bit at odds with the rest of the model, which is predominantly red. Finally I decided to just add a detail stripe in a no-too-contrasting colour.
Although I like the combo with the red, it also looks just a tad too bland, but I'll add a freehand black line to separate the colours, and if I can pull it off, a thinner white line withing the black one. That should provide sufficient variation considering the gun still needs its metalics and the gold/copper detailing.
Then I still need to do the Halo which will receive the same treatment as the rest of the gold detailing on the armour.
The two hip plates I'll definitely leave red but I am pondering what to do with the armpit armour, a.k.a. the besagews.
Although I'm tempted to do so, I'm also feeling hesitant to make them too contrasting with the rest of the model. The shields are perfect to paint some personal heraldry on them using white or yellow, halved or quartered, and then add some small iconography, but I fear that the result might draw the eye in too much and thus distract from the whole of the model. The alternative would be be a full red or black background (one each?) and the keep the iconography accordingly simple in black (on red) and white or yellow on black.
I'm curious to hear what your thoughts are on this?
And just because it's a cool pic.

BoLS Lounge : Wargames, Warhammer & Miniatures Forum
Results 91 to 100 of 115
Thread: Large Blood Angels Terminator
-
10-15-2013, 11:03 AM #91Brother-Captain

- Join Date
- Dec 2010
- Location
- Belgium
- Posts
- 1,058
 Blood Angels Army Project
http://www.lounge.belloflostsouls.net/showthread.php?t=12017
-
10-15-2013, 02:26 PM #92Chaplain
- Join Date
- Apr 2010
- Location
- Phenix City, Alabama, United States
- Posts
- 251

He's looking good . If you want to go for color, go for it as BA's do pride themselves on their art work.
-
10-15-2013, 10:22 PM #93Chaplain
- Join Date
- Jul 2013
- Posts
- 467
I'll reserve judgement on the weapon until you've cleaned up the weathering like you did on the body, but it looks good right now, and I think you made the right choice with the white band on the drum mag.
I think for contrast, you might go with a white shield mounted on the hips. Dirty white of course, but the piece definitely needs at least one piece of contrast, but not in a central location where all eyes will be drawn to it.
Two questions for you:
1. What kind of tape do you use for masking areas that doesn't tear off paint when you peel it off?
2. How the heck do you put in more than 4 pictures on a post?
Incredibly solid work, good sir!
-
10-16-2013, 01:08 AM #94Brother-Captain
- Join Date
- Dec 2010
- Location
- Belgium
- Posts
- 1,058
My initial thought as well, at one point I was even tempted to add some detail to the entire red armour using slightly darker red lines but I don't trust my hand to be consistent enough to really make it work. As for the shields, visual balance takes precedence over flufff in this case. Originally Posted by bloodangel 83

Hmmm, an unexpected idea indeed! Contrast with the hip shields, good one, I'll let that sink in for a while. Although I'm feeling really hesitant to do them entirely in a different colour, I could add enough detail there for it to add a visual counter balance. Maybe even something simple like a campaign markings, or kill marks. Good idea.... Originally Posted by interrogator_chaplain
1: I use the Tamiya masking tape (comes in different widths), I love that stuff. Like goldilocks, it sticks just right, cuts easily and is strong enough to handle manipualtions of all kinds. As it is a bit pricy, I only use it for fine detailing. If I need to cover large surfaces, I use that tape for the edges and fill in large surfaces with tin foil, or with 'generic' paint masking tape. But that stuff you do need to make it slightly less sticky with your fingers as it tends to rip off paint otherwise. Also, when peeling off any kind of masking tape, do it gently, and never, ever, pull 'up'. Pull & slide the tape flatly back over itself so you give as little upwards leverage as possible to the tape+paint.
2: Photoshop ^^. First I rescale the photos to a 800 pixel width (some forum have these restrictions). I actually use something handy such as ACDSee for batch-resizing. And in Photoshop I rescale the canvas size of one photo length-wise and stick the other ones below it. Flatten, save, and voilà, ONE very long photo. Muha-muha-muhahahaa! *little finger on mouth corner*
Actually, any kind of image/photo software would the trick, but seeing as I can play piano with Photoshop's shortcuts, it's my tool of choice.
Last edited by Meph; 10-16-2013 at 10:14 AM.
Blood Angels Army Project
http://www.lounge.belloflostsouls.net/showthread.php?t=12017
-
10-16-2013, 02:47 AM #95Chapter-Master
- Join Date
- Jul 2009
- Location
- Aldershot, Hampshire, United Kingdom
- Posts
- 2,154

Yay I have missed this project.
Looking great, I agree that the bolter mag looks a little bland though. I think your black band idea should work though.
As for the besagews, go crazy on personal heraldry! Leave the blood drop unblemished (other than weathering, unless you plan on repainting it as a shaped gem stone or seomthing) but otherwise go full out on free hand designs. I'm kinda surprised you have two though. I would have thought one would be enough, but more might make the model look cluttered. That said, I am sure you have dry-fitted them and so have a better idea of that than I.Always thinking 2 projects ahead of anything I've yet to finish
http://instinctuimperator.blogspot.co.uk/
-
10-16-2013, 11:16 AM #96Initiate
- Join Date
- Oct 2013
- Location
- UK
- Posts
- 4
Omg that is amazing
-
10-17-2013, 04:10 AM #97Battle-Brother
- Join Date
- Oct 2011
- Location
- Katy tx
- Posts
- 44
Originally Posted by marcus
Personally I dig the changes. Anatomically the marine 28 mm model is crap. I think you captured the feel of the model well in a way that could be worn by an upscaled person no problem. The shoulder placement and shape of the body really works well in my opinion.
Well done!
-
10-18-2013, 09:53 AM #98Brother-Captain
- Join Date
- Dec 2010
- Location
- Belgium
- Posts
- 1,058
Cheers fellas!
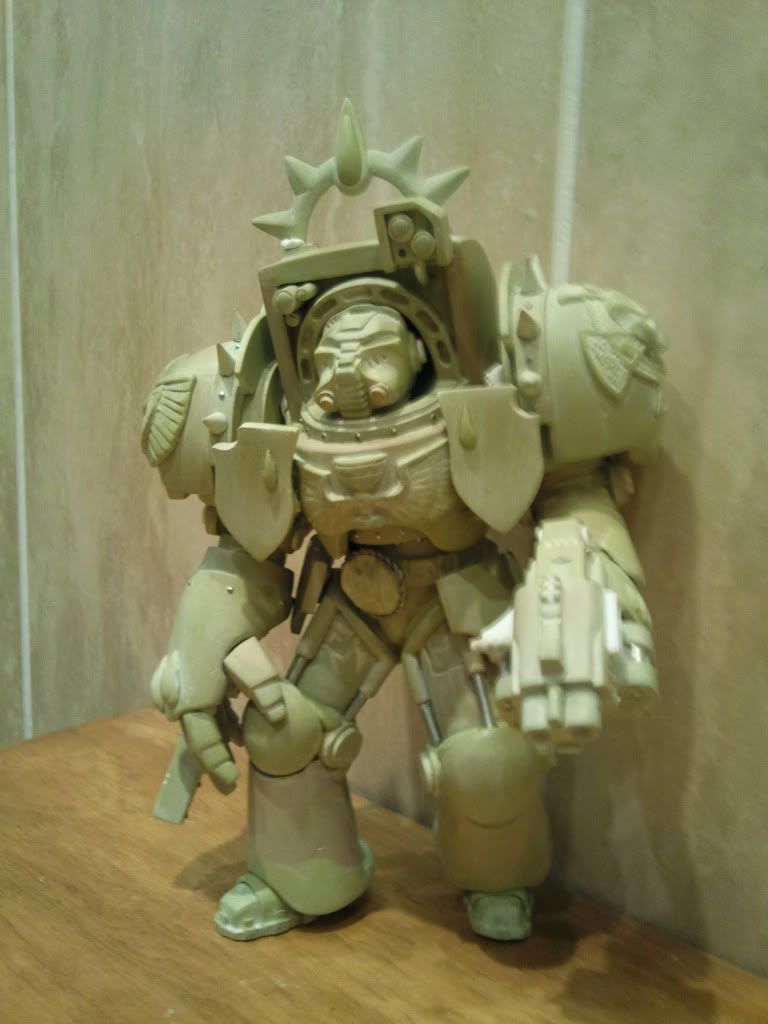
@SS: Here's one of the last photos that Marcsu/cassar made right before boxing the pieces of the sculpt and shipping it to me. (Hence the 'slack' pose of the arms)
As you can see the twin shields work quite well on the whole of the model.
@SR: Your first post on the forums here! I'm flattered, cheers!
@UV: Yeah, Marcus did a kick-*** job on the sculpt, that's for sure!
Alrighty, the Storm Bolter is ready for sealing with varnish and then it's time to pack out the oil paints for washes and stains.
The weapon may look a bit rough at the moment, but as you may have seen from my previous models, oil paint washes are wonderful, wonderful thing. the lighting also isn't showing all the subtle details in the paint.
Also, painting the freehand stripes made me realize that free-handing complex details on the shields will be out of the question. Getting those little lines straight, crisp, and parallel is frickin' stressful. Being the scale that it it, any iconography will have to be mathematically crisp in order not to look too dodgy. Considering I the rest of the detailing on the model are either etched brass and decals, I need that same crispness to stay consistent. I've gone through the decals I have and already found some usable stuff, and I'm thinking maybe to print some new ones. I still have some laserjet decal paper and that way I can go all-out if I want to. Now just to design some...
 Blood Angels Army Project
http://www.lounge.belloflostsouls.net/showthread.php?t=12017
-
10-18-2013, 10:57 AM #99Battle-Brother
- Join Date
- Oct 2011
- Location
- Katy tx
- Posts
- 44
Lovely work man. I had a question about your salt weathering technique. First, how do you do that! secondly. For 28mm sized models, do you use a finer grain of salt? it looks like you used a 'crusher' salt on this model to get varried pebbles sized up, but for 28mm obviously the size disparity would be enormous!
-
10-18-2013, 01:41 PM #100Brother-Captain
- Join Date
- Dec 2010
- Location
- Belgium
- Posts
- 1,058
Well, the technique is deceptively simple really. Firstly, you seal the undercoat(metalic, rusty) with spray varnish. When dried, you copiously cover the entire model with cheap hairspray until soaking wet, and then carefully sprinkle the salt on. Once it's dried you airbrush or spray over it. With the airbrush you can also apply some highlights. And once that's completely dry, you rinse the model under cold running water and rub it gently with an old toothbrush. The cold water will melt the salt and voilà, you've got weathering which actually lies deeper that the top coat.
You really need the size of the salt grain right, usually with a mortar and pestle, and then it's critical that you sift it very well. You do not want any fine salt as that will either just melt away partially in the paint leaving a bubble which won't rub off, or cover in clumps, resulting in huge chunks of paint being scrubbed away under the water.
That's exactly the reason why this technique is best suited for large models and vehicles. Personally I wouldn't use it on 28mm infantry as scale-wise you'll need rather finely grained salt and the risk of it covering large chunks or just texturing the paint is just too damn haaa! I think large grain salt on small models could work for stuff as nurgle, rusty necron, renegades etc. Or hmmm. perhaps even for subtle colour variations on camo for IG and stuff like blotched eldar colours, if you keep the two colours near enough. Food for thought.
The whole process, while simple, is rather time-consuming (the drying and scrubbing mostly) so I haven't used it on my 28m BA vehicles either, preferring 'dry-sponging' as time-quality wise it's a lot faster while still doing a good job at believable weathering.Blood Angels Army Project
http://www.lounge.belloflostsouls.net/showthread.php?t=12017


 Reply With Quote


