
Hello fellow BoLS Loungers!
While I was lured out of lurking by a certain contest, I figure, why not make the best of it and introduce myself with some proper content!
I consider myself a dedicated Xenos player, with a good 3-4 K of Tyranids, and some Eldar I've recently purchased from a friend. I'd been meaning to get into Eldar because I loved the Aspects and aesthetics of their tanks. A beautiful blend of elegance and firepower.
That love of Eldar Armor drew me to Yme-Loc, and I couldn't shake the feeling that the epitome of the Eldar war doctrine (Speed, firepower, and synergy) was embodied by the Fire Prism, so I had to do something special. All that clear plastic was begging for some light!
My girlfriend is an electrical engineer and skilled hobbyist herself, and with her expertise in the handling and selection of delicate parts, we got this:
[url]http://youtu.be/XBTCoNnW-Os[/url]
Sadly a full demo will have to wait while I repair the snapped turret (see 40K low points thread). Depending on what you guys are interested in, I can put together a bit of a how-to guide, with planning circuits, and some basics on handling components.
BoLS Lounge : Wargames, Warhammer & Miniatures Forum
Results 1 to 10 of 15
Thread: Lighting Up the Fire Prism
-
03-08-2012, 11:43 AM #1Battle-Brother

- Join Date
- Mar 2012
- Location
- Chicago
- Posts
- 26
 Lighting Up the Fire Prism
-
03-08-2012, 12:54 PM #2Brother-Sergeant
- Join Date
- Oct 2010
- Posts
- 67
Welcome.
-
03-08-2012, 01:08 PM #3Brother-Sergeant
- Join Date
- Mar 2010
- Location
- Vero Beach, FL
- Posts
- 82
i would be interested in the tutorials. I have been wanting to light up a monlith for a while and condutive paint soulds fun.
-
03-08-2012, 01:44 PM #4Initiate
- Join Date
- Mar 2012
- Location
- Belize
- Posts
- 1
 ~~~~~~~~
glad for see you here guys

This could ruin any life but not ours , because you can take [url=http://kinkyboi.com]lamisil prescription[/url] for anti-fungal or Tadalafil vs Erectile Dysfunction such as [url=http://super-cialis.com/]cialis super active[/url], you should feel very fine!Last edited by Jakkars; 03-10-2012 at 05:06 PM.
-
03-08-2012, 02:29 PM #5Veteran-Sergeant
- Join Date
- Oct 2010
- Location
- Albuquerque, NM
- Posts
- 121
Lights are shiny. More please!
-
03-13-2012, 01:33 AM #6Battle-Brother
- Join Date
- Mar 2012
- Location
- Chicago
- Posts
- 26
As promised, I've whipped up a guide describing the process used when my girlfriend and I added LEDs to a Fire Prism. My inspiration was this thread I stumbled upon several years ago, but was not comfortable with all of the conversion work. I didn't have the tools, nor did I trust myself not to completely ruin such an expensive model: [url]http://s11.invisionfree.com/Work_In_Progress/index.php?showtopic=2185[/url]
I think it turned out well, In all of it's base-coated glory:

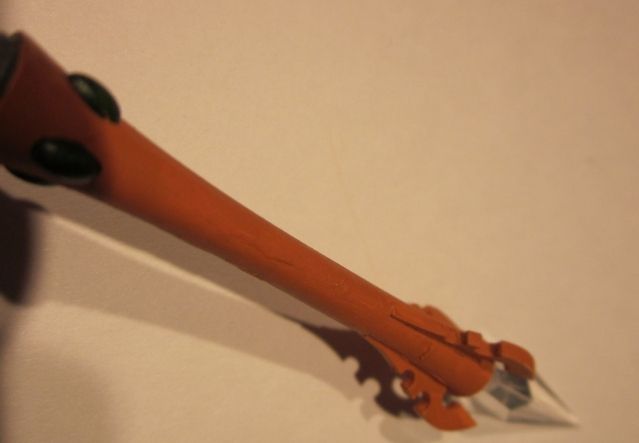
My technique requires less cutting into the model, is a form of cold solder for linking components, and allows you to create contacts for rotating parts. The draw-back is that you will be running a thick line across the surface of the model. This can be mitigated by drawing on surfaces that are out of sight or otherwise escape notice, like the underside of an arm/cannon, the joint between two components, or an already heavily textured section.
Here's some photos for you to determine if this will be an issue: here is the underside of the Fire Prism's barrel:
Okay, so I'll kick this guide off with some notes about supplies and circuits.
This is the circuit writing/repair pen that I used:
[url]http://www.radioshack.com/product/index.jsp?productId=3964901[/url]
Whew! More expensive than I remembered, and you will note the mixed reviews in the comments below. Things to note: this is a finicky paint pen, with a thick paint, you will need to pay attention to how dirty the flow-regulating tip is, how well you've shaken the mixing ball (note, when in the slightest doubt, shake it another 30 seconds, really rattle that ball!), and how much pressure you re putting on the well. I had some of the troubles mentioned by the negative comments, but I found that they could be overcome by careful examination, cleaning, shaking, and otherwise reading the directions (funny, that).
I haven't shopped around enough to recommend this pen over other items on the market. This particular one had the advantage of being available at the local Radio Shack, and having a fairly resilient finish when dry, which comes in handy when creating contact points. Though, with the powers of the internet, I'm sure someone could locate a superior or cheaper brand. Please post if you find one.
Here's a fun trick that is readily allowed by paint: connections that allow turrets to rotate:
The trick is to have the circuit with separate lines going to and from the voltage source go through the swivel joint. Here, we apply the conductive paint liberally and use the model to prevent shorts.
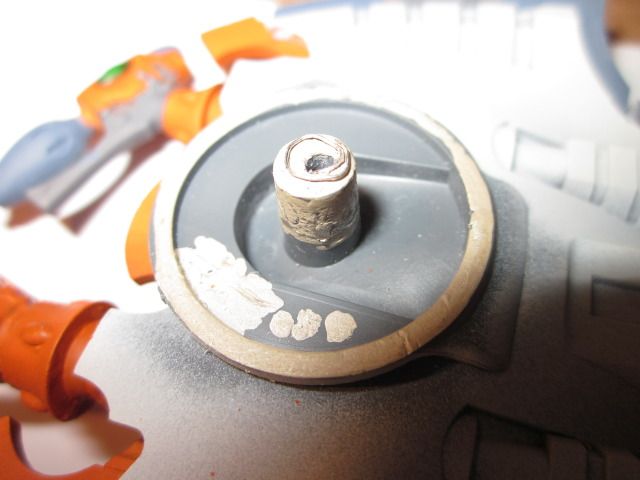
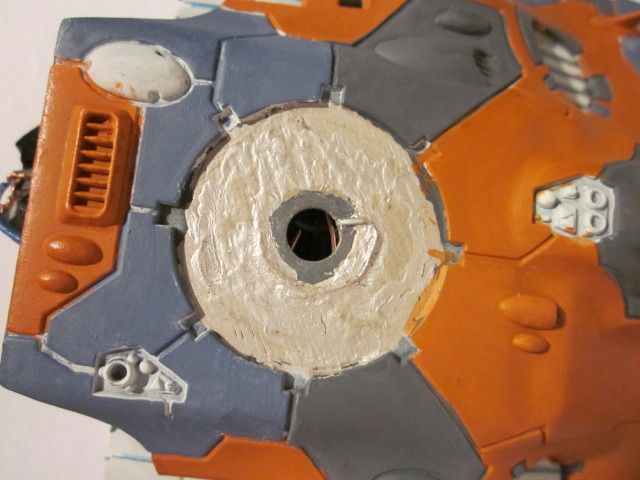
Here, we drilled a hole through the center of the peg and fixed a wound wire to the end, this makes contact with a wound wire suspended under the hole, which leads to the battery. For the other part of the circuit to get past the hole, we cut a notch for a coated wire to lead into the field of conductive paint. This connects to the painted outer ring of the turret which has a line which wends it way to the cannon. To connect the wires (or any other component) to your drawn circuit, you glue down the part to your model and just squeeze a glob over the contact and wait for the paint to dry, easy as pie!
-
03-13-2012, 01:34 AM #7Battle-Brother
- Join Date
- Mar 2012
- Location
- Chicago
- Posts
- 26
My apologies, I bumped int an image limit. Now, let's look at setting up your circuit:
When you look at your model, you know what the end result will look like to you, but what will it look like to the electrons?
This tank:
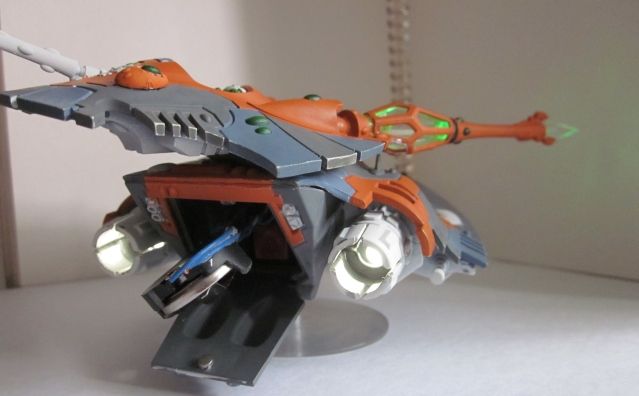
is this circuit:
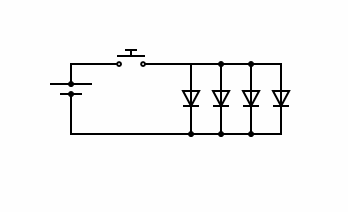
This is called a parallel circuit, which means that all of these components will have the same voltage difference going across them. You can stretch the fork however you like, this is where the instruction guide can help you trace and plan your lines. In this case, you have a battery, a push button switch, and four LEDs. The switch and battery are in the chassis, and the fork with th LEDs has been both stretched down the prism's barrel, and across both engines.
Parallel circuits also carry the benefit of easy isolation of breaks in your circuit. Only the branch with the break will be down, as the circuit is still complete for the other branches. Your enemy is the short circuit. Electrons are lazy, and search for the path of least resistance. Creating photons is hard work, so they will skip all of your branches with LEDs in favor of the short. So plan room for your lines.
Handling sensitive electronics:
Small electronic components are vulnerable to damage from static electricity, levels you won't even feel. The static charge from peeling scotch tape off the roll is more than twice the charge required to fry most sensitive devices, walking around on a dry day generates ten times the destructive charge. This can be avoided by taking off static-inducing clothes like fleece jackets, sitting in a non-rolling chair, and grounding yourself with either an anti-static wrist strap or touching a conductive, grounded object constantly throughout your handling of the LEDs (especially blue ones). Grounding yourself properly depends on your workspace. One good grounded object is the metal case of a plugged in PC with a grounding wire (3-prong plug), another is a water pipe. For more information, look up Electrostatic Discharge.
I went to Mouser Electronics website for components: [url]http://www.mouser.com/Optoelectronics/LED-Lighting/_/N-74g9t?SAP=true[/url]
The site is not the most helpful for browsing, so you need to go in with an idea of the size, color, brightness, and power demands that you want. I think my next post will be going into the characteristics of LEDs.
Give me some idea of what projects you have in mind, and I will put together a loose rule of thumb for selection with my favorite expert. Otherwise, I'll just go into why we went with the LEDs we did for the Prism.
-
03-13-2012, 10:33 AM #8Chaplain
- Join Date
- Apr 2011
- Posts
- 287
nice lighting effects!
Ahhh- I might be having a heart attack!! I am over weight, over fifty and I am speedballing tranq darts and pure adrenaline!!
-
03-13-2012, 11:21 AM #9Scout
- Join Date
- Mar 2012
- Posts
- 12
Looks Awesome!
-
03-13-2012, 11:28 AM #10First-Captain
- Join Date
- Jul 2009
- Location
- London U.K
- Posts
- 1,924
Great stuff!

 Reply With Quote


