

Looks like your off to a great start. Keep up the great work.
BoLS Lounge : Wargames, Warhammer & Miniatures Forum
Results 11 to 20 of 69
-
03-31-2012, 09:51 AM #11Chaplain

- Join Date
- Apr 2010
- Location
- Phenix City, Alabama, United States
- Posts
- 251


-
03-31-2012, 10:54 AM #12Scout
- Join Date
- Mar 2012
- Location
- College Station, TX
- Posts
- 12
I'll be following this. Very cool of you to give us some insight in to how complex these kits are. And Black Templars are fast becoming one of my favorite chapters, so that makes it even cooler.
-
03-31-2012, 11:16 AM #13Scout
- Join Date
- Mar 2012
- Posts
- 14
That does look like a lot of fun to build and paint. One of these days I buy one... one of these days.
-
03-31-2012, 01:23 PM #14Librarian
- Join Date
- Mar 2011
- Posts
- 703
OP: You said you've build few of these already? If so, i've got a couple of questions if for you to answer if you got the time:
- Are the warhound molds in good condition? (I mean, i am not that great at working with resin, so are there few enough flaws in the build for a mediocre builder to work with?)
- Have you worked with airbrushes? If yes
-> Would you recommend painting the warhound with airbrush or regular brush?
I am so very much hoping to build one as soon as i can afford it, and thus i am trying to gather as much info before hand as possible so i won't blew it when i finally get to work with one..
cheers
Wildcard
-
03-31-2012, 02:11 PM #15Battle-Brother
- Join Date
- Jul 2009
- Posts
- 31
Man that kit looks complicated- good luck!
-
03-31-2012, 02:38 PM #16Scout
- Join Date
- Mar 2012
- Posts
- 10
can't wait till next update
-
03-31-2012, 02:52 PM #17Brother-Sergeant
- Join Date
- Jul 2009
- Location
- Sarasota, FL
- Posts
- 62
The molds are great on detail. Edges are crisp and the mold lines are usually minimal. That said, there are hundreds of pieces here from multiple molds so there will be some variation. During inspection of my current kit I found that 2 pieces had significany "mold shift" - where the edges didn't meet perfectly. There will be some sanding and green stuffing required to get a proper surface. But since the mold makers plan for this kind of event, none of the seams run across detail that I would have to resculpt. Originally Posted by Wildcard

The titan I am currently building is the best I've handled yet. They seem to have changed some of the gates that the resin pours through. Making them larger has allowed fills on tiny pieces to resolve completely and nearly eliminate bubbles.
In the early days, FW models could have a significant issue with air bubbles and slick spots. New techniques and materials have nearly eliminated them. So, if you buy a second-hand titan or one of the rare forgeries around, you will have more problems.
All in all, a moderate level of modelling experience is required. You should be familiar with sanding, scraping, gap filling, green stuff, and handling very small and fragile pieces (some are inly a few mm in size). I reccommend that you use a good brand of CA glue and pur LOTS of pins in the model. There will be a lot of stress on some very small areas so don't be shy. You will need a razor saw or a rotary (dremel) tool with a cutting disc. There are lots of gates and tags to be removed and clippers can crack the thinner pieces.
I'll be posting some tips and tricks as I go along. Feel free to ask as I go.
I have used the GW airbrush for basing masses of troops in custom colors. It does NOT have the control necessary for finish painting. It is a basecoat tool only. Originally Posted by Wildcard
Large models like these lend themselves well to airbrishing and the FW studio guys frequently use them when painting the display pieces. But, they also have to go back and spend massive amounts of time with a brush. There is just too much detail to think that anyone other than a highly skilled airbrush artist with professional gear could begin to do the model justice.
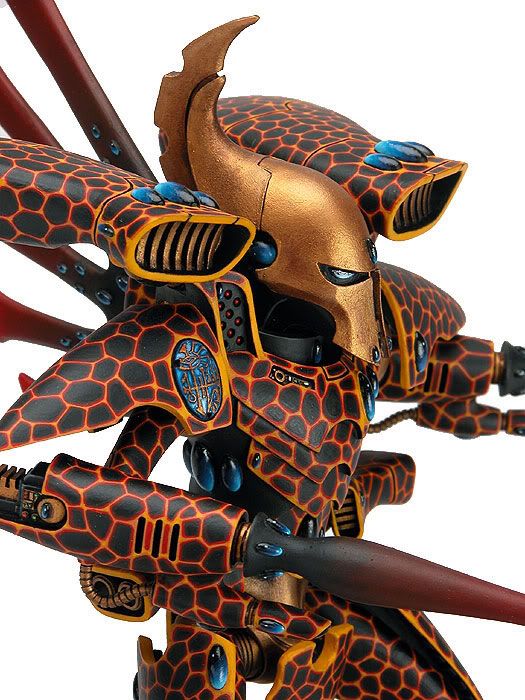
I have only ever done my titans with brush painting. Even my Goden Demon winning Eldar Titan [URL="http://s276.photobucket.com/albums/kk25/Sinsinatus/Painted%20Miniatures/Golden%20Demon%20Winners/Eldar%20Revenant%20Titan/"]"Firewalker"[/URL] was completely brush painted. Here it is...
If you are confident with a brush, stick with it. ANY technique you can get with an airbrush can be duplicated by hand. There are just some techiques that are easier to accomplish with the airbrush. I wouldn't want to try to learn a new set of skills for just one model... or to try and learn them on this as a first piece. Go with what you know best.
I hope that this helps.Last edited by Sinsinatus; 03-31-2012 at 02:56 PM.
Sinsinatus
"Go ahead. Roll the dice and see if I get to eat your spleen."
-
03-31-2012, 05:39 PM #18Chaplain
- Join Date
- Apr 2010
- Location
- Phenix City, Alabama, United States
- Posts
- 251
Nice looking Elder titan. I can see how you won the GD. Thanks for the update and keep them coming please. BA83
-
03-31-2012, 07:33 PM #19Brother-Sergeant
- Join Date
- Sep 2009
- Location
- Renton, WA
- Posts
- 69
Thank you very much for showing us the building of one of these massive kits. It makes me want one even more!
-
03-31-2012, 08:46 PM #20Librarian
- Join Date
- Mar 2011
- Posts
- 703
Thanks for the reply and tips sinsinatus!
The reason i was thinking about the airbrushing, is that my color scheme includes lots of blue and gold, both that i am having a trouble layering smoothly to practically any surface (especially the gold, i don't know how to describe it, but it seems like it would be full of stripes / scratches and the color underneath will just shine through).

 Reply With Quote


