

I hear ya, the Mars pattern Warhound is easily one of the coolest models out there.Originally Posted by Brakkart

Hey, and a great idea with the CD's. Probably the best and easiest way to go if the model is meant to be used on the table. Those huge bases must be quite annoying to move around.
Hmm, or perhaps some metal disks for extra weight, or do you feel that the support the give would be enough for the model?
BoLS Lounge : Wargames, Warhammer & Miniatures Forum
Results 21 to 30 of 69
-
04-01-2012, 06:16 AM #21Brother-Captain

- Join Date
- Dec 2010
- Location
- Belgium
- Posts
- 1,058
 Blood Angels Army Project
http://www.lounge.belloflostsouls.net/showthread.php?t=12017
-
04-01-2012, 08:39 AM #22Brother-Sergeant
- Join Date
- Jul 2009
- Location
- Sarasota, FL
- Posts
- 62
If you need extra weight for balance, you probobly won't know until 90% of the assembly is done. If I need it, I just add some bar lead weights as I detail the bases and camouflage them. However, unless your pose is very mobile (eg. running) the cd's will probobly give all the support you need. Originally Posted by Meph
Making sure that the toes are pinned at every joint and then to the bases themselves is much more critical for ensuring the model can survive the rigors of gaming and travelSinsinatus
"Go ahead. Roll the dice and see if I get to eat your spleen."
-
04-02-2012, 09:32 AM #23Brother-Sergeant
- Join Date
- Jul 2009
- Location
- Sarasota, FL
- Posts
- 62
Arch and 1st toe joint assembly
So, I spent several productive hours finishing the foot assemblies for the Warhound. It' will take a couple posts to get all the pictures up so please scroll through...
There is one step you get to take before the planning kicks in. You need to collect all of the toe joints that connect directly to the foot arch. They have a large plug that will need shortened by about half so that the pieces fit flush. Once you trim the length, you need to drill holes for pins in each socket and plug.
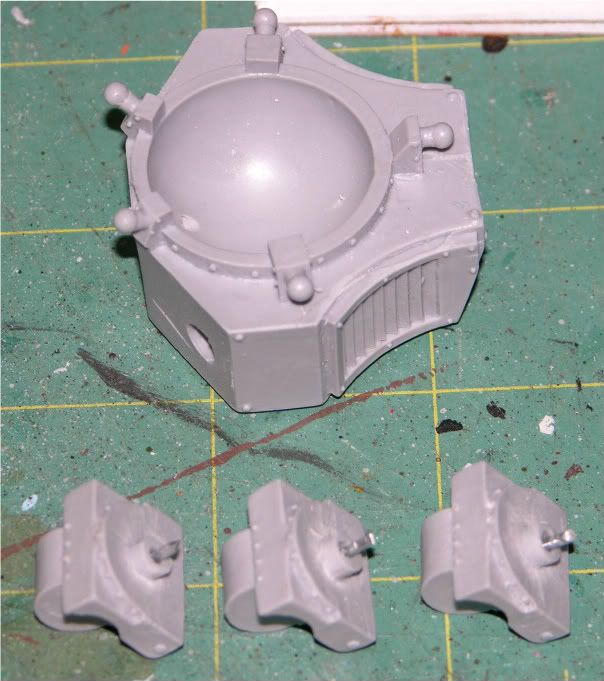
All of these will be glued into the arch piece. I fitted mine squarely in each socket because the pose on this titan will be a straight forward motion pose. If yours will be turning or standing on irregular rubble or a wreck, only the central and rear sockets will seat squarely. The others will need to be rotated slightly to accomodate the positioning of the toe. Hold off on gluing these until your base is ready if you want the most realistic pose. Sorry, I won't be covering that in this how-to.
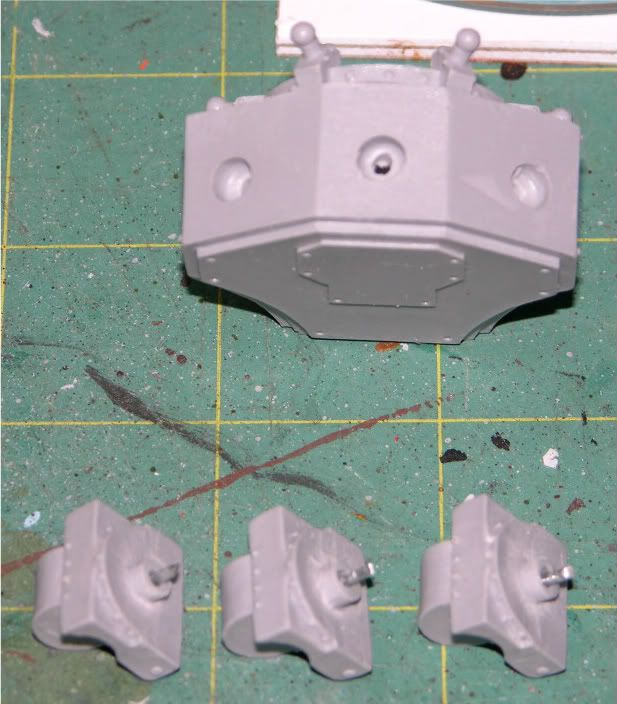
First toe joints glued in place...
 Sinsinatus
"Go ahead. Roll the dice and see if I get to eat your spleen."
-
04-02-2012, 09:41 AM #24Brother-Sergeant
- Join Date
- Jul 2009
- Location
- Sarasota, FL
- Posts
- 62
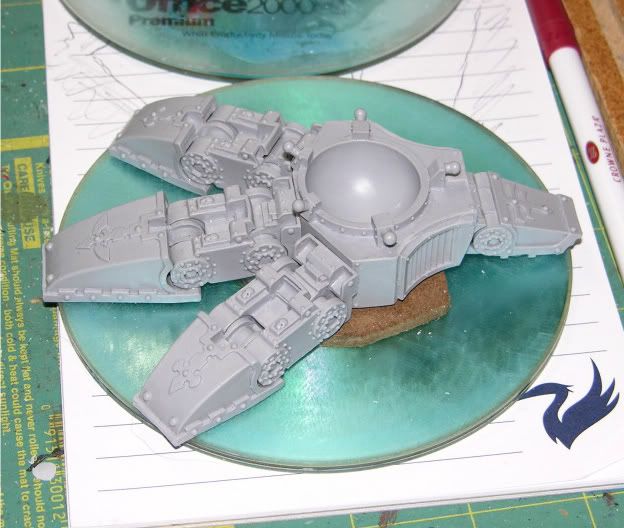
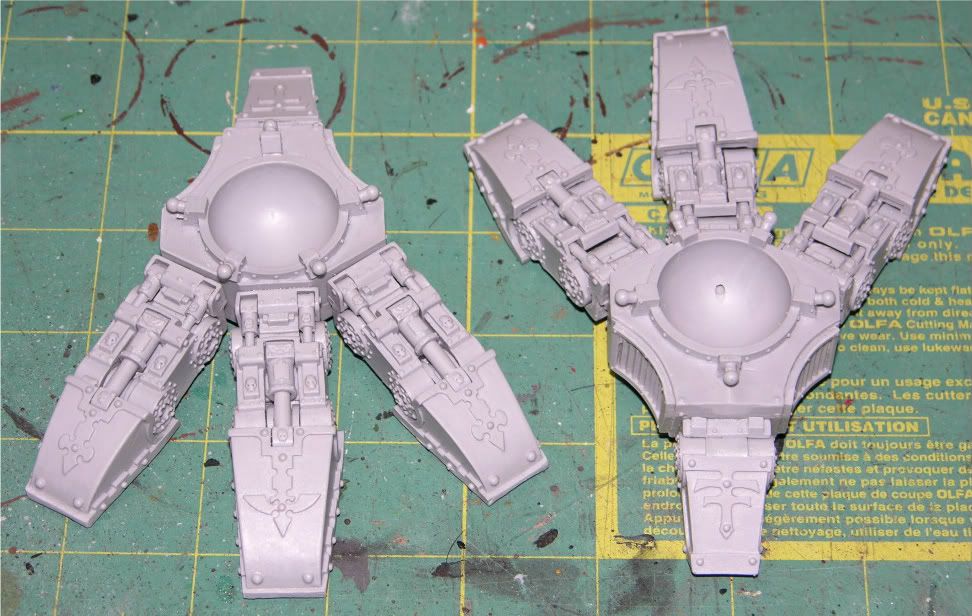
Test-posing the feet
Your first decision is how to pose each foot. The foot pose will determine whether the model appears to be running, walking, or standing... unless you want it to run with walking feet - think about a duck. To make sure that the pieces line up for your pose, find something the hold the arch in place as you connect the toe sections. I used pieces of scrap MDF and some of the resin "gates" that had come off of the bigger pieces. Some poster adhesive can also be useful for posing.

Once you have decided on your pose. Beging to assemble each foot. Start with the center toe and with the pieces closest to the arc. I completed that front center toe and the rear toe and then let the assembly cure. If you have accelerator for your CA glue, this will speed up your process - just don't get accelerator onto the sockets still to be posed. The stuff has a nasty habit of staying active for a while and gooping up the next step.
When those toes are nice and secure. Go ahead and do the outer ones. Remember to start close to the arch and move outward. Your shims from earlier will help to hold your pose. Here are my feet glued into their final poses.
 Sinsinatus
"Go ahead. Roll the dice and see if I get to eat your spleen."
-
04-02-2012, 09:56 AM #25Brother-Sergeant
- Join Date
- Jul 2009
- Location
- Sarasota, FL
- Posts
- 62
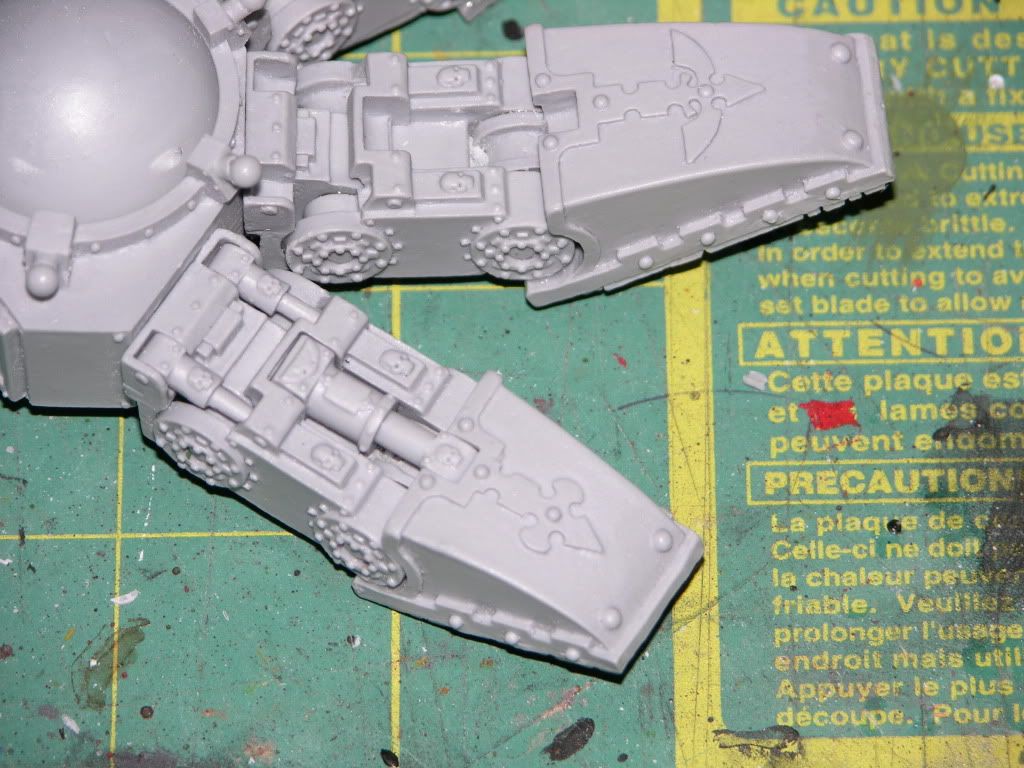
Pinning the toes
I know, I didn't put any pins into the toes. That's because each one would have to be individually aligned and getting the pose exactly right is HARD. So, a couple titans ago Ic ame up with a different method for reinforcement.
Once the foot assemblies are cured - but before you start on the toe pistons - I drill up through the bottom of each toe joint. In the photo below I have circled the location of the holes I drilled. The direction of drilling is at a fairly shallow angle from arch towards toe tip - follow the arrows. Using these locations allows you to drill from one piece into the next after the toes are perfectly posed. Each joint gets reinforced with a metal pin that I cut to be flush with the surface and then superglue (CA) into place.
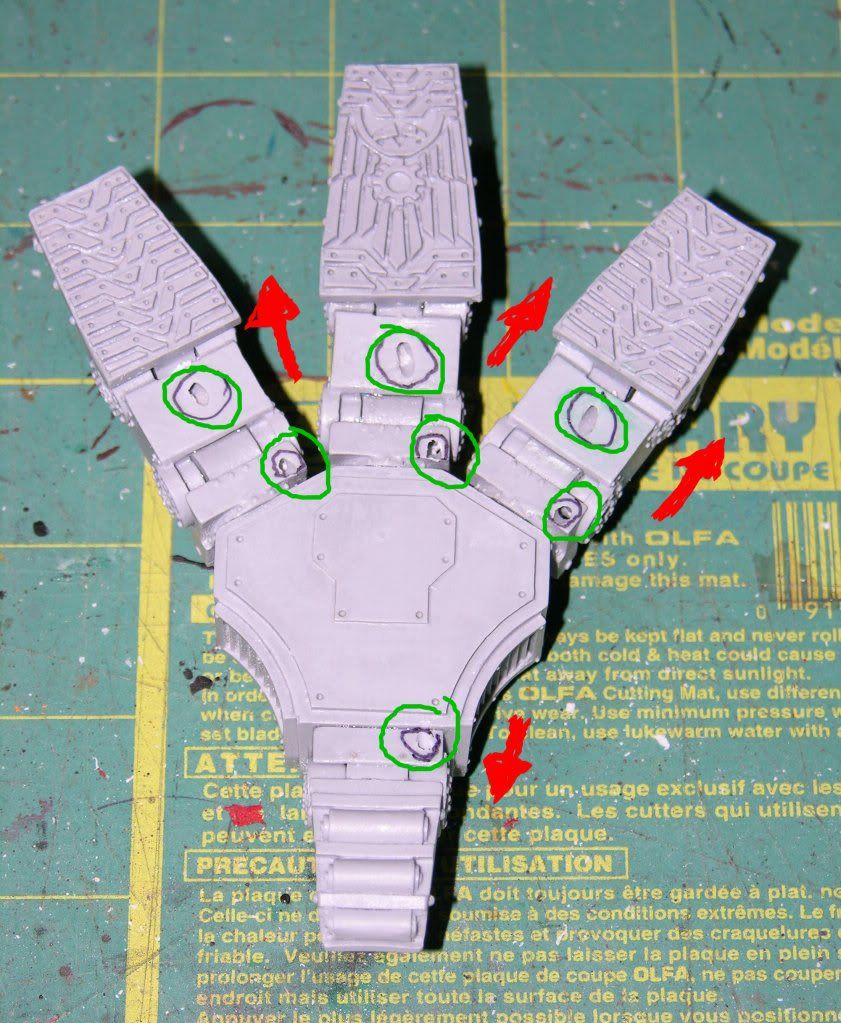
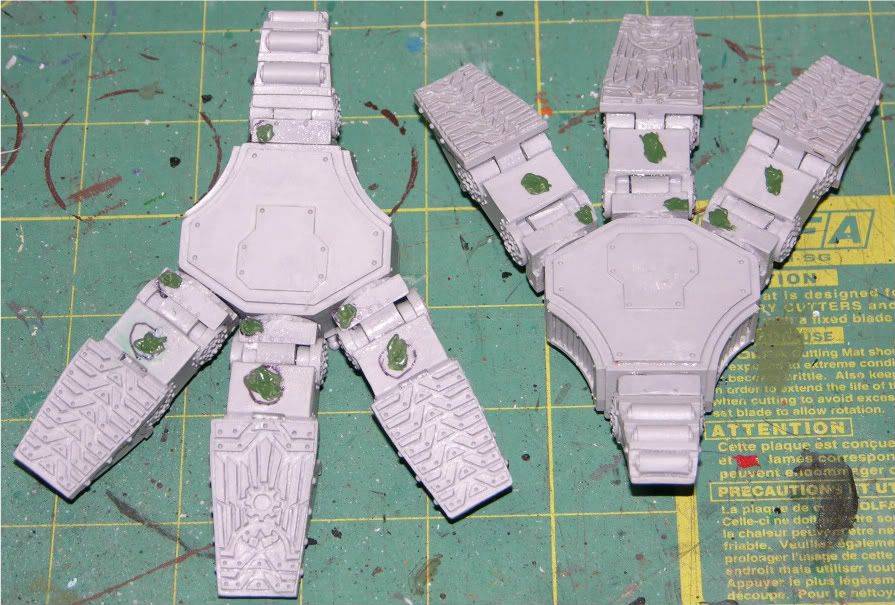
Once the glue is dry, I smooth over the holes with a small plug of greenstuff. I only do this if there is a possibility of the underside of the foot being seen.
Make sure you do not install the toe pistons before completing the pinning. If you drill too deep and come out the top, inserting the pins later will cover the hole. Also, the superslue can migrate if it is thin and could glop up the piston detail. That is hard to correct.Sinsinatus
"Go ahead. Roll the dice and see if I get to eat your spleen."
-
04-02-2012, 02:19 PM #26Brother-Captain
- Join Date
- Dec 2010
- Location
- Belgium
- Posts
- 1,058
Nice progress on the feet.
I'm guessing that in case you want a full running pose with only one foot on the ground, that you'd need to pin the the foot socket to the ankle ball with some thick wire, no?Blood Angels Army Project
http://www.lounge.belloflostsouls.net/showthread.php?t=12017
-
04-02-2012, 05:57 PM #27Brother-Sergeant
- Join Date
- Jul 2009
- Location
- Sarasota, FL
- Posts
- 62
When I get the pose set on the legs I'll drill for pins. Part of the reason the feet aren't attached to the bases yet is so that I'll have every angle available when it's time to drill. I reccommend pinning the ball joints even when both feet are attached to a base. CA is very strong versus tension and compression. It fails when stressed by shearing or torsional forces... like those you'd find in a ball abd socket joint. Originally Posted by Meph
Sinsinatus
"Go ahead. Roll the dice and see if I get to eat your spleen."
-
04-06-2012, 09:26 AM #28Brother-Sergeant
- Join Date
- Jul 2009
- Location
- Sarasota, FL
- Posts
- 62
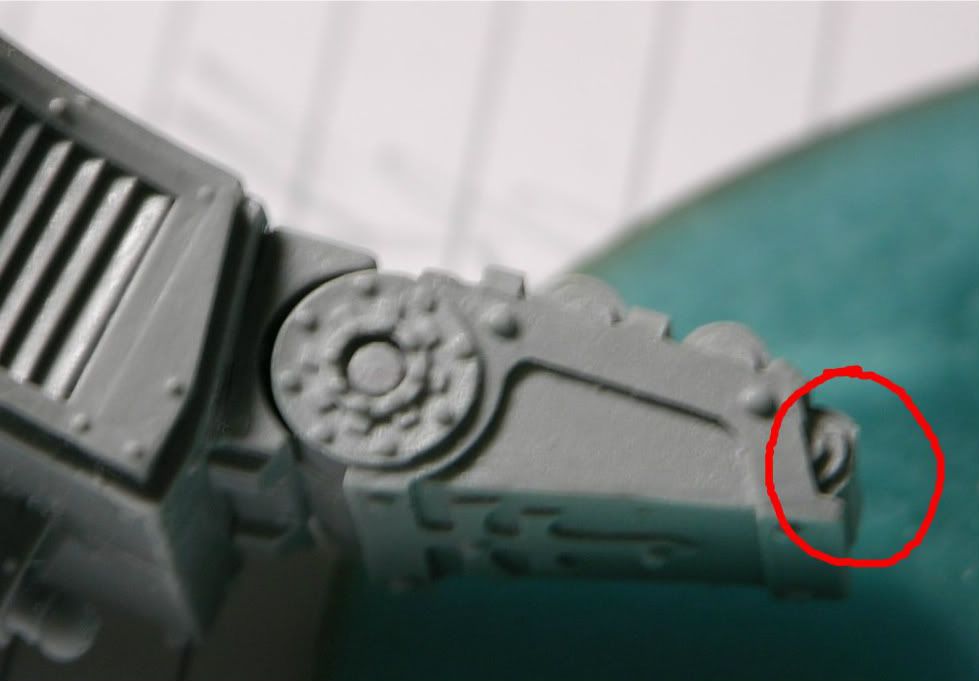
Quick word of caution. The gate as it comes off of the rear toe is poorly placed. When removing the gate with clippers or even a saw, be sure to leave sopme extra flash. You can easily trim the flash down with a hobby knofe or file. I cut the gap a little close and the resin decided where it wanted to part despite my wishes. This resulted in a flattened toe tip that you will see in the photo below. Greenstuff will fix it. It's just annoying that I have to do it at all.
More to come soon.
 Sinsinatus
"Go ahead. Roll the dice and see if I get to eat your spleen."
-
04-07-2012, 05:14 AM #29Chaplain
- Join Date
- Apr 2010
- Location
- Phenix City, Alabama, United States
- Posts
- 251

Nice work, keep up the work. BA83
-
04-07-2012, 07:09 AM #30Brother-Sergeant
- Join Date
- Jul 2009
- Location
- Sarasota, FL
- Posts
- 62
Toe Piston Assembly
In addition to the great look of the model and incredible level of detail, one of my favorite things is how poseable it is. When Simon Egan designed the kit, he left each builder the ability to assemble this beast in many, many ways - from standing tall to an all-out run. To accomplish this, the kit does not included multiple copies in different lengths of parts that might be needed for the individual poses. Instead, these pieces were cast so that the builder would cut them to the length actually needed once the pose was established. This method gives the greatest level of detail and realism while unfortunately adding much to the overall complexity. As the kit doesn't come with extras, you want to get these parts right the first time. I reccommend you read all the way through before you start on this portion of the build.
From my earlier posts, you can see that I left the toe pistons off until now. Part of the reason was to avoid damaging them or glue migrating to foul them. Besides, if I'm going to have to repeat a process 18 times, I find it best to be systematic. Because each toe articulates independently, you have to cut each piston for its specific slot in each toe... not just one generic length per foot.
I began by cutting all of the pistons for the feet off ot their sprues leaving them as long as possible. You really want to leave all the length you can. you'll be trimming soon enough. I then removed any mould lines. This isn't super imperative because the seams are on the sides of the piston where they would be almos impossible to see. I'm just too a%$# retentive to leave it to chance though.
Each of the smaller toe pistons - there are 2 per forward toe for 12 total - consists of a head and a rod. To get the proper length, I slotted the head into its socket and then lay the rod over the recieving socket (look for green arrow). This will give you a way to guage the length to cut. In the picture below, I show where I determined to make the cut. The place to make the cut is one-half the depth of the socket (see the red line). As long as the socket cast clean, you will be able to place the piston rod-end first into its socket and then swing the head into its slot. I dry fit each piece, remove it, apply CA glue win the slot and socket using a toothpick or paperclip, and then seat the piston rod-first into place.
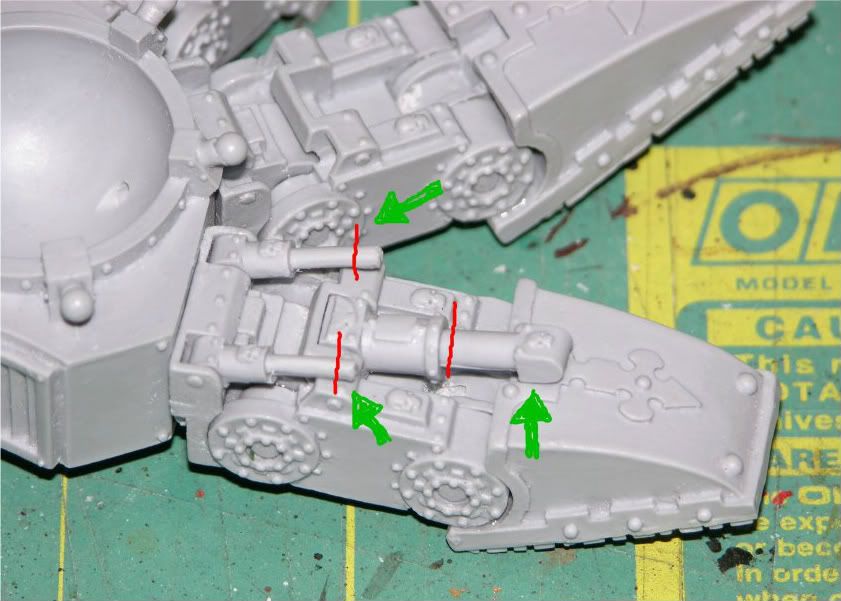
The larger 2-part piston closer to the toe is measured in a similar fashion. Only this time, you put the 2 pieces together before seating the head to get the length. Once the assembly is in place, I use a small steel ruler to measure from the toe-end of the piston back to just short of halfway down the socket (green arrow). It is better to be slightly long and have to shave off a touch than to try and reattach what you cut off - or worse - rebuild with plastic rod. Now remove the assembly and take the two pieces apart. Transfer your measurement to the rod-end of the smaller piece and then trim (see red line). Put the assembly back together and dry-fit it into position. If it is still too long, just scrape a little off the end of the rod-end of the short piece and test again. If you try to force the asssembly into place when it is too long, it WILL BREAK. Gluing is just like the smaller toe pistons. But, you also need to smear some CA glue into the socket where the two pieces fit together.
Now sit back, breath a sigh of relief, and enjoy the fact that you only have 5 more toes to go...
Here is a picture of one completed toe.
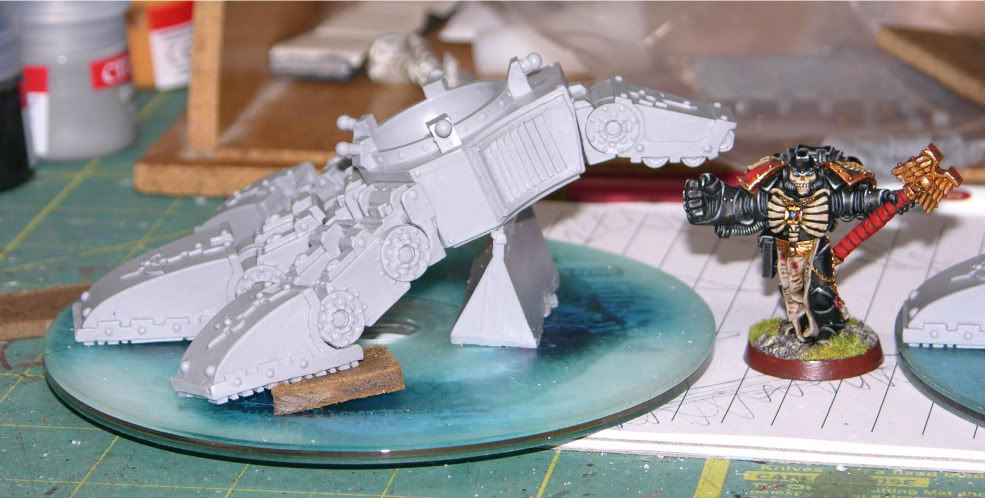
Now for the feet with all the pistons in place. That's the first 48 pieces (and 22 pins) of the model set. In my experience, this is the second hardest, most tedious part of the build. Doing it right makes all the difference though.
(NOTE: FW has started including 4 extra of the small,single-piece toe pistons in each kit. This helps if you make a mistake and is a nice afterthought. However, if you are cautious and thoughtful, you'll not need them. Measure twice. Cut once. Eh?)Sinsinatus
"Go ahead. Roll the dice and see if I get to eat your spleen."

 Reply With Quote

