

My board has been transported between 5 or so places of residence, used as a bedside table and a multitude of other sins. The case is certainly strong enough for regular use, though you may want to consider a more secure container for the clips. The first layer of paint did chip off a little, particularly on the raised edges of the hills, but nothing too dramatic. Part of that was, I think, because it was hastilly applied and didn't have any undercoat at all. A matte varnish (probably with gloss over the lava/swamp in your/my case) is probably a good call and/or some kind of protective layer of bubble wrap or cloth would also help. On other people's and shops' boards, the main dammage I have seen has been from use, particularly where people just push their models or drop heavy ones, so I'd guess varnish is the best solution there.
As for me... Well, I don't have space for a permenant set-up, so they will be sitting in the case a lot of the time. Whether I'll be taking them out of the house; dunno yet. Will see how much other people want to play on them how often. I certainly wouldn't be opposed to taking it with me to a game (having to drive to pretty much any game anyway) so we shall see.
BoLS Lounge : Wargames, Warhammer & Miniatures Forum
Results 11 to 20 of 36
Thread: Realm of Battle Swamp Board
-
11-20-2012, 04:45 PM #11Chapter-Master

- Join Date
- Jul 2009
- Location
- Aldershot, Hampshire, United Kingdom
- Posts
- 2,154

 Always thinking 2 projects ahead of anything I've yet to finish
http://instinctuimperator.blogspot.co.uk/
-
11-24-2012, 07:12 AM #12Chapter-Master
- Join Date
- Jul 2009
- Location
- Aldershot, Hampshire, United Kingdom
- Posts
- 2,154
All right Swampaholics! Got some pictures for you all!
I've managed to get the first pour done for the deeper water on the board sections. Started off just pouring rough blobs over the deepest parts;
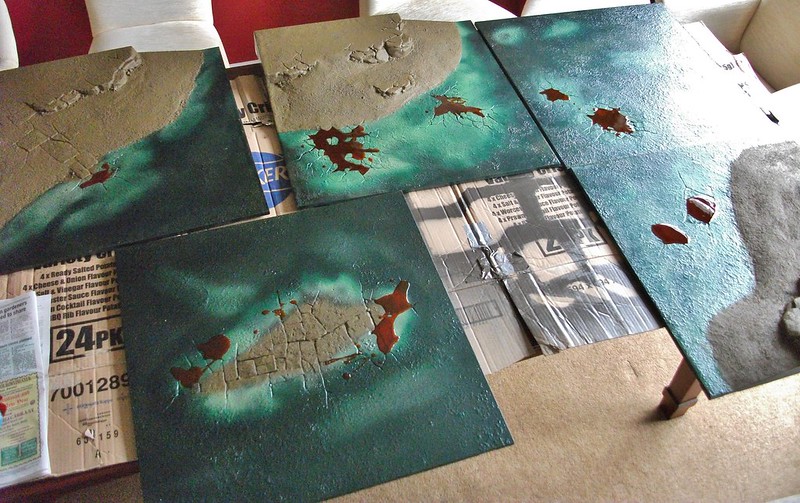
As you can see I wasn't trying to be too neat at this stage as I was planning on brushing out the edges to smooth the transition between these sections and the later stages.
I filled them up to just above the level of the board. You can still see the detail underneath. Skulls in this case!

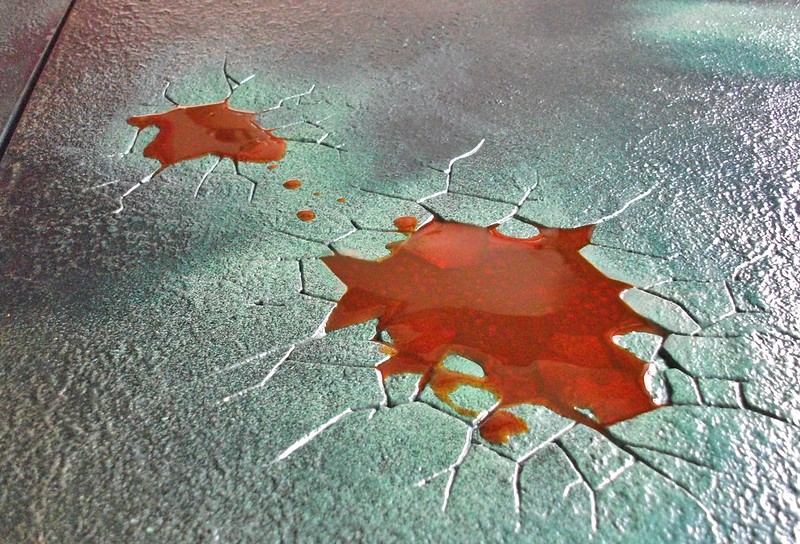
I brushed out the edges carefully, then topped up the blobs by pouring a little more varnish into the recesses. As much as possible, I tried to let the varnish level out naturally, but occasionally a little push with the brush was needed, especially into the smaller cracks.
Just a quick shot so you can see a little more clearly the end effect. I've been assured that the varnish WILL dry completely clear, but that the thicker portions may take longer than the 8-10 hours drying time in the instructions on the can. I'll have to let you know tomorrow how that goes, hopefully with some more pictures.
In other swamp news, I have sprayed my Wall of Martyrs and have a ton of paint and sand to start matching the base to the board. Again, more pictures later hopefully!
Now, I have to go get on with some stuff... and hopefully not get too high on the fumes coming off the varnish.Always thinking 2 projects ahead of anything I've yet to finish
http://instinctuimperator.blogspot.co.uk/
-
11-25-2012, 07:42 AM #13Chapter-Master
- Join Date
- Jul 2009
- Location
- Aldershot, Hampshire, United Kingdom
- Posts
- 2,154
Good news and bad news.
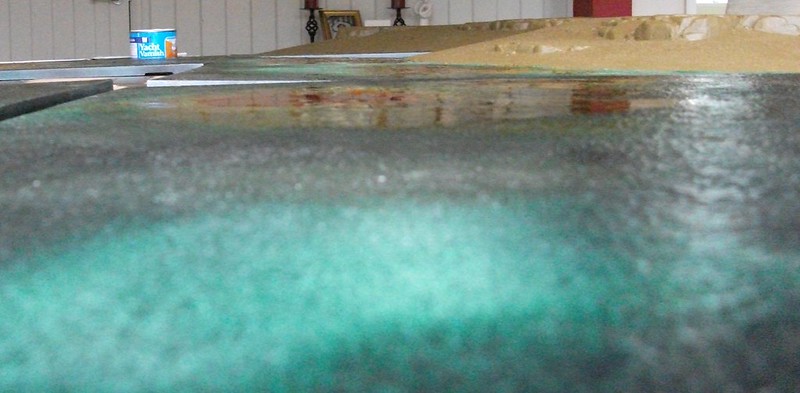
Apparently my deffinition of clear and colourless is very different from the varnish manufacturors. Basically, the deep bits are still wet, but the edges and the shallower puddles have set. And are still orange. Not exactly what I had in mind.
Good news though, it does look pretty swampy. At least that's what I've been told by those who've seen it in the flesh. So hopefully once I've covered the rest of the boards, it will still look good!
Not realy worth posting pictures as the boards still look about the same as the third picture in my last post. Once the deep water has finished setting I'll get round to the next layer, as well as getting some pictures of the skulls with some models floating above them. Not necessarilly in that order of course!Always thinking 2 projects ahead of anything I've yet to finish
http://instinctuimperator.blogspot.co.uk/
-
11-29-2012, 05:02 PM #14Chapter-Master
- Join Date
- Jul 2009
- Location
- Aldershot, Hampshire, United Kingdom
- Posts
- 2,154
Quick picture update today!
I still haven't managed to do any more work on the swamp board because, if you can believe it, I am STILL waiting for the resin to dry! The good news is that all of the deep pools of resin have formed a fairly thick skin. However, that skin is still quite felxible and there is definitely still fluid underneath on most of them... Still, it's a start!
So why the picture you ask? Well, as the resin has dried out, it has shrank. Rather than simply setting like I thought a resin varnish would, some part of the fluid has evaporated, making the deep pools less deep. That has resulted in this;
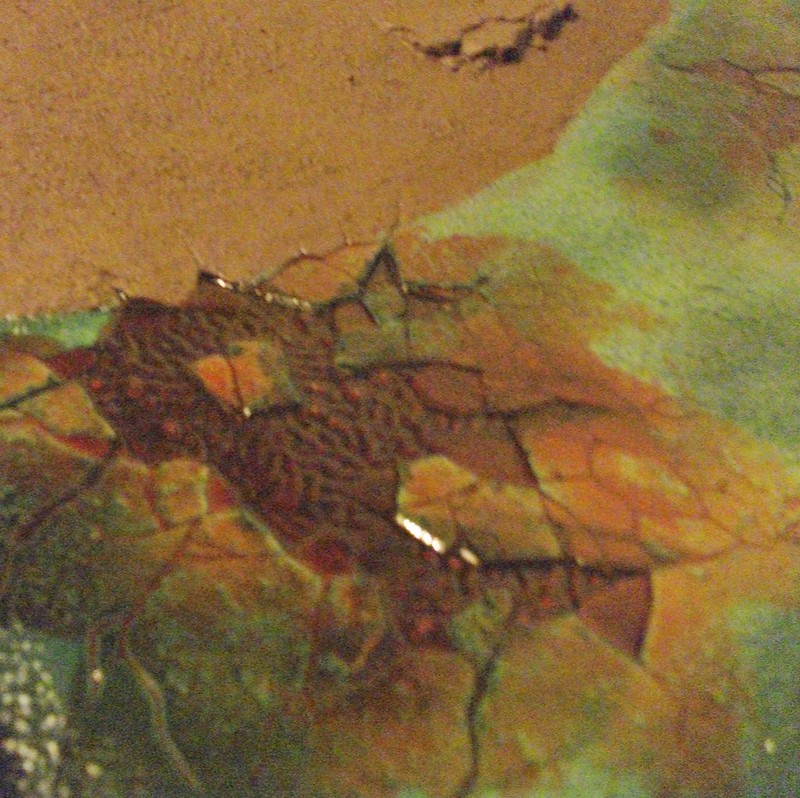
Cool wavey effect over the skulls; sure, I'm not displeased with that as was trying to work out how to sculpt something similar into it anyway! Outlines over the rocks; meh, I'm not too concerned. At least i don't think it will detract from the finished look of the board. 1-2mm drop below the level of the rest of the board? Oh bloomin heel. Really not good. It doesn't look too bad on that board but...
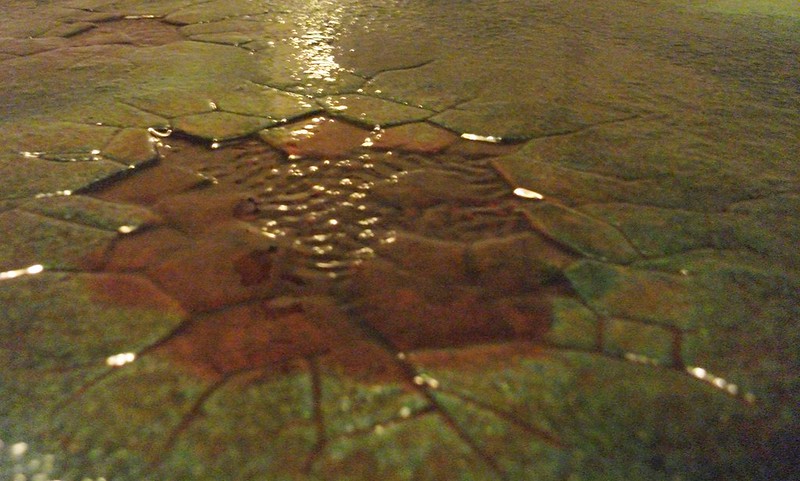
Yeh that is quite a big drop. I'm sure I can just do another pour, but I was hoping that I could just paint the next layer over all of the wet parts of the board. I guess that's gone out of the window. What I might do, once this layer has set completely, is use some Water Effects to fill the difference between the levels. Hopefully that should dry out a little quicker than this varnish has as well. Then I'll do the next varnish coat as planned. Hopefully this approach will help keep the wavey distorted look down in to the skull pits as well.
I was also planning on getting another pic showing that you can still see the skulls quite clearly through the resin, but I couldn't get my camera to take a decent pic. Either the light was reflecting off it too much or I couldn't get the right focus... Hopefully some better light will help there. If not, I have a few friends who've been asking for practive with their DSLRs...
Until then,
ShadesAlways thinking 2 projects ahead of anything I've yet to finish
http://instinctuimperator.blogspot.co.uk/
-
11-30-2012, 01:35 AM #15First-Captain
- Join Date
- Jul 2009
- Location
- London U.K
- Posts
- 1,924
This is looking awesome!
Great work BOLS chum.
-
11-30-2012, 02:35 AM #16Iron Father
- Join Date
- Sep 2010
- Location
- Vancouver Island, BC
- Posts
- 4,970
I would go for another layer, it's looking good but I think another layer would be worth it in the long run.
It's a fantastic looking board none the less .
http://paintingplasticcrack.blogspot.co.uk
.
http://paintingplasticcrack.blogspot.co.uk
-
11-30-2012, 03:07 AM #17Librarian
- Join Date
- Aug 2011
- Location
- Between Fact and Breakfast
- Posts
- 851
this is looking absolutely awesome! I hope to get a chance to play on it one day!
ALShrive; found somewhere between fact and breakfast.
Horseman of the Derailment
-
01-12-2013, 06:17 PM #18Chapter-Master
- Join Date
- Jul 2009
- Location
- Aldershot, Hampshire, United Kingdom
- Posts
- 2,154
I might be wrong, but it looks like the varnish has FINALLY dried!
I mean, it's only taken 2 months nearly... However, in our garage at the moment, it is entirely possible it has just frozen.
I'll get it in to the house tomorrow, let it warm up and see what happens. With any luck, I might even get the next layer on. Who knows, by the summer I might actually be able to start sculpting some waves onto it!Always thinking 2 projects ahead of anything I've yet to finish
http://instinctuimperator.blogspot.co.uk/
-
01-14-2013, 03:47 AM #19Chapter-Master
- Join Date
- Jul 2009
- Location
- Aldershot, Hampshire, United Kingdom
- Posts
- 2,154
Yeh... I said frozen jestingly...

The only bits that haven't dried are the deep skull pits. One of which got stored on it's side by my parents, so looks utterly terrible at the moment with a huge bulge protruding above the level of the flat areas of the board. Not quite sure what I am going to do about that one. In both cases, the 'clear' varnish has also dried very dark, so you can't actually see the skulls underneath very well at all.
What I may end up doing is cutting the varnish skin away and let the fluid beneath set. I think it might be too large an area to just poke pins through to give it chance to dry. Really disappointed with this result, as I've got a feeling it might just ruin the overall look of those sections of the board. I am almost tempted to break out the white spirits and strip the varnish off completely and start again, but I'm not sure what it will do to the rest of the paint job, and don't really fancy starting from scratch.
Any suggestions?Always thinking 2 projects ahead of anything I've yet to finish
http://instinctuimperator.blogspot.co.uk/
-
01-14-2013, 04:33 AM #20Chapter-Master
- Join Date
- Jul 2009
- Location
- Aldershot, Hampshire, United Kingdom
- Posts
- 2,154
Or...
Whilst manipulating one of the bulges of fluid (as I have been doing since the boards started warming up yesterday) I'll accidentally tear the skin with my hands, and pull it off easily. Now I am going to have a lovely sharp edge in my water...Always thinking 2 projects ahead of anything I've yet to finish
http://instinctuimperator.blogspot.co.uk/

 Reply With Quote


