
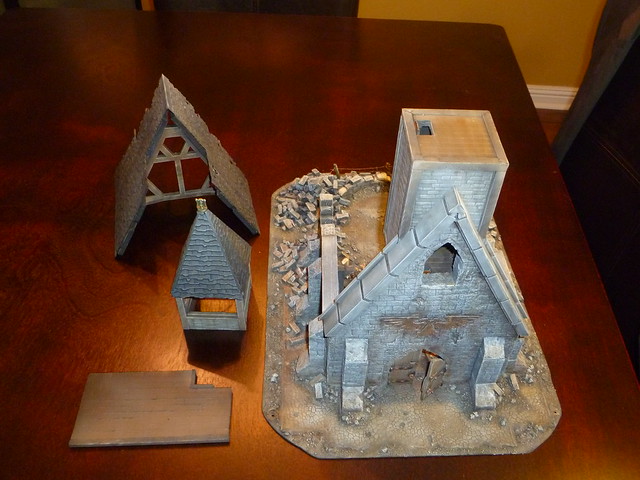
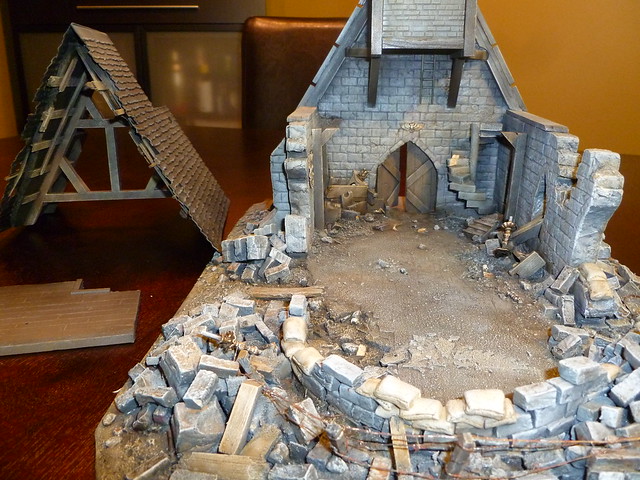
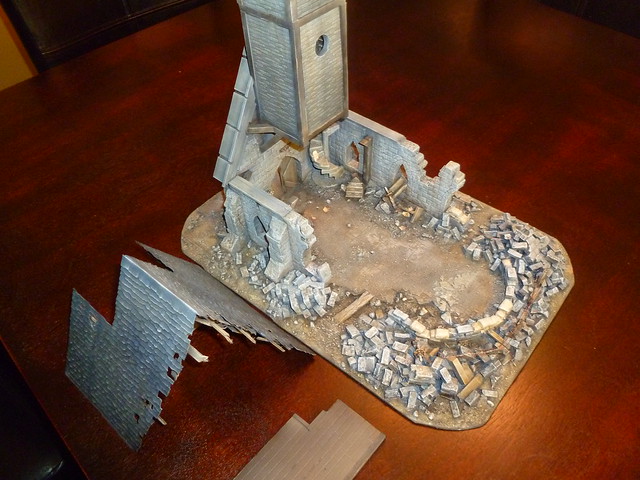
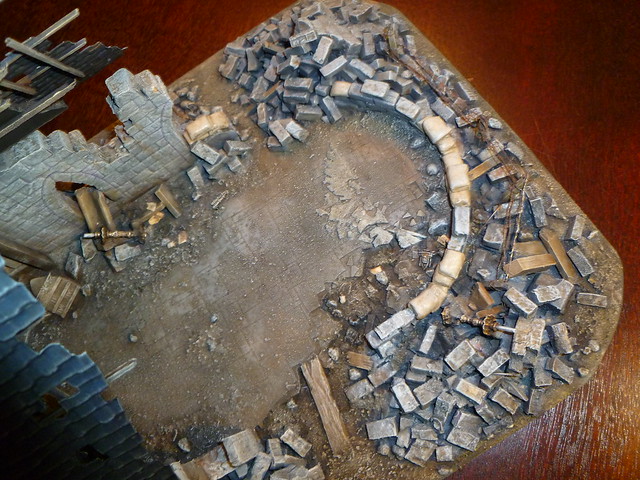
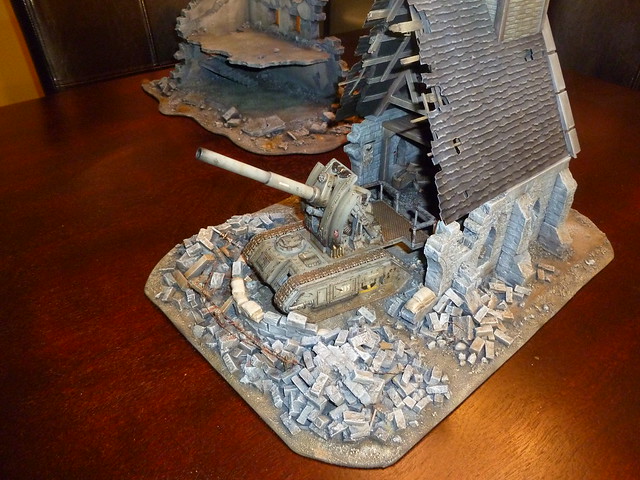
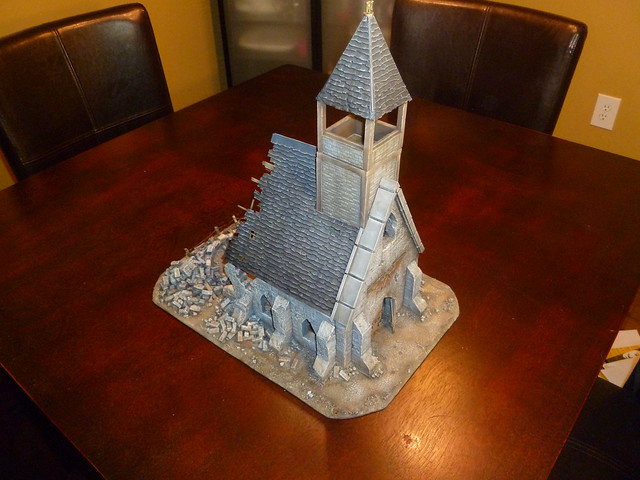
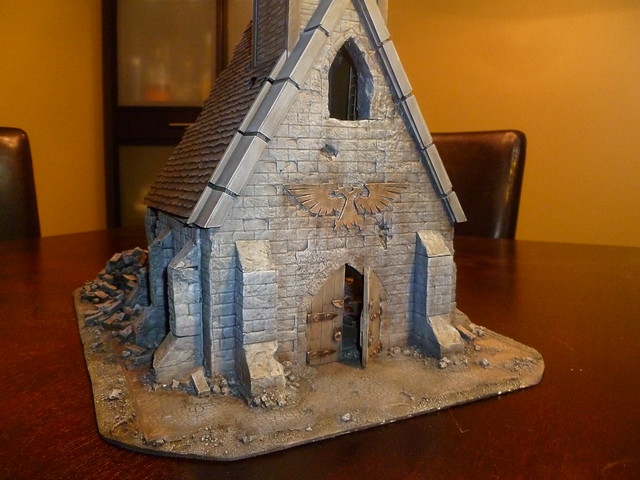
The holiday break was a great opportunity to work on some terrain projects I've had in mind for a while. Nearly finished with this Imperial Church.
I really like to have terrain usable in a game, and to that end I made the roof removable as well as the top level of the bell tower and one wall of the tower. Still have a few finishing touches I'd like to implement but any comments or suggestions are welcome.
BoLS Lounge : Wargames, Warhammer & Miniatures Forum
Results 1 to 10 of 15
-
12-31-2012, 05:59 PM #1Scout

- Join Date
- Dec 2012
- Location
- Savannah, GA
- Posts
- 14
 Scratch Built Imperial Church Holiday Project
-
12-31-2012, 06:00 PM #2Scout
- Join Date
- Dec 2012
- Location
- Savannah, GA
- Posts
- 14
A few more shots
-
01-05-2013, 02:21 PM #3Brother-Sergeant
- Join Date
- Feb 2012
- Location
- Hove, Sussex
- Posts
- 75
That's pretty impressive work. How the deuce did you do that? What sort of materials did you use?
-
01-06-2013, 10:39 AM #4Chaplain
- Join Date
- Aug 2012
- Location
- New Baltimore, Michigan, United States
- Posts
- 300
Very nice.
-
01-07-2013, 04:32 AM #5Chaplain
- Join Date
- Jan 2010
- Posts
- 272
VEry nice indeed! Would also be interested to know what materials you used. Is it scratch built or a modification to a bought set?
-
01-07-2013, 09:14 PM #6Scout
- Join Date
- Dec 2012
- Location
- Savannah, GA
- Posts
- 14
Hi, thanks for the remarks.
The walls are blue foam, with the brick formed by lightly scoring the surface with a ball point pen, then pressing a rock onto the surface to impart that texture. Hats off to whoever invented that technique. All the rubble is blue foam as well, once again, imprinted with a nice rough rock from the backyard to give it texture.
The base is MDF. The floor is a piece of foam-core board covered with a piece of textured plasticard. The roof is likewise foamcore covered with a textured plasticard. These plasticard pieces can be found through sources like Plastruct; really invaluable for scratch building pieces.
The bell tower is also foam-core covered in textured plasticard. Would have been cool to have a bell in there...but then there would have been no room for models. Oh well.
Most of the rafters are just pieces of hobby/craft wood (from any hardware store like Lowes or Home Depot) cut with a mini mitre saw. The saw was about $40 but worth the investment, imo.
The broken furniture and front doors are made from balsa.
The barbed wire was made based on a really great posting I found over on the forums on Coolminiornot. If anyone is specifically interested, I could try to dig it up. I think it was under something like "uber realistic barbedwire" or something like that.
And naturally, like any good project, a good old fashioned raid of the bits box was involved.
I'd be more than happy to comment on any individual aspect in more specific detail, but didn't want to bore anyone with a long(er) post.
-
01-08-2013, 06:48 PM #7Scout
- Join Date
- Dec 2012
- Location
- Savannah, GA
- Posts
- 14
Thanks for the remarks. It's built from blue foam, foam-core board, a little hobby/craft wood, and textured plasticard. I'd be happy to go into more detail about any specific aspect of the model, but a full run down of everything would probably be too long and boring

-
01-14-2013, 01:47 PM #8Brother-Sergeant
- Join Date
- Feb 2012
- Location
- Hove, Sussex
- Posts
- 75
How do you do your stonework? Is it blue foam with the stone pattern carved in?
-
01-14-2013, 08:25 PM #9Scout
- Join Date
- Dec 2012
- Location
- Savannah, GA
- Posts
- 14
It's actually really easy.
After you've cut the foam to size, take a ball point pen (a cheap BIC or whatever will do just fine) and draw the bricks on in a grid with a straightedge. You really don't care about the ink that gets transferred to the foam but instead, the impression/indention of the line into the foam from drawing it. So after you're done, you'll have the seams sort of etched *into* the foam. One tricky part is to make sure you don't pierce the thin skin of the foam. In this regard, avoid using a fine tipped pen. If you do break the surface, it'll look all torn, but you can always cover up a few goof ups later with battle damage (gotta love the grim darkness of the far future in this regard). The trick is to apply fairly light pressure right up to the point were it would break through the surface if you pushed any harder. This'll create a nice smooth groove.
Since mason work and bricks themselves are imperfect, you'll then need to break the perfect brick pattern you've created. Take a little wooden block (one the same size as a "brick" is ideal) and use it to press in a few of the bricks at random. As you compress the foam of a few bricks, it looks now like they are not all 100% perfectly placed and adds realism. (i.e. they are no longer all on a perfect plane as some are slightly indented 1/16 inch, some indented 1/8 inch, etc). Its also good to just press in only a corner or two on some individual bricks, rather than the whole brick.
The final step is to go out the backyard/garden and get a nice rough stone. About the size of a golf ball seams about right for me. Gently roll this stone over the foam to impart the texture of the rock into the foam.
Hope that all made at least a little sense. And hats off to whoever invented this technique (it certainly wasn't me!).
-
01-15-2013, 06:48 PM #10Scout
- Join Date
- Dec 2012
- Location
- Savannah, GA
- Posts
- 14
I wrote up a reply to your question, Colonel, but every time I tried to post it, it keeps telling me that it needs to be approved by the moderator(?). Yet other of my posts apparently don't. I know I sound like an idiot, but does anybody know what's going on here? I don't believe there were any profanity laced tirades in there that some auto filter is picking up on.


 Reply With Quote
