

Airbrushing Infantry.
I was going to get into cleaning an airbrush next but I have just had this question sent to me via PM. I thought it would be good to share with you guys how I airbrush infantry models and answer the question at the same time. Here's the question and my reply.
Hello!
I have been following your airbrushing tutorial with more than a little interest. I bought an airbrush a couple years ago (Badger I think?) but then burned out before I got a chance to start trying it.
I have been an Eldar player since 91ish and seeing someone airbrushing Eldar has given me a bit of a spark again because I have LOTS of unpainted models hehe...
So I guess my question is this, have you airbrushed the infantry at all? How does that work? I definitely want to use it on my new Wraithknight, Crimson Hunter, and my plethora of Serpents and Fire Prisms that I never painted.. but I have lots of unpainted foot troops also and was wondering how I might be able to "catch up".
My answer is this.
It sounds like you have a little experience with you airbrush but your just a little rusty. Painting foot troops is not different than painting tanks really, it's just a bit more fiddly. I've painted space marines of all sorts of chapters with my airbrush and I have recently just painted my Iyanden Wraithguard with my airbrush too. It's not too difficult at all.
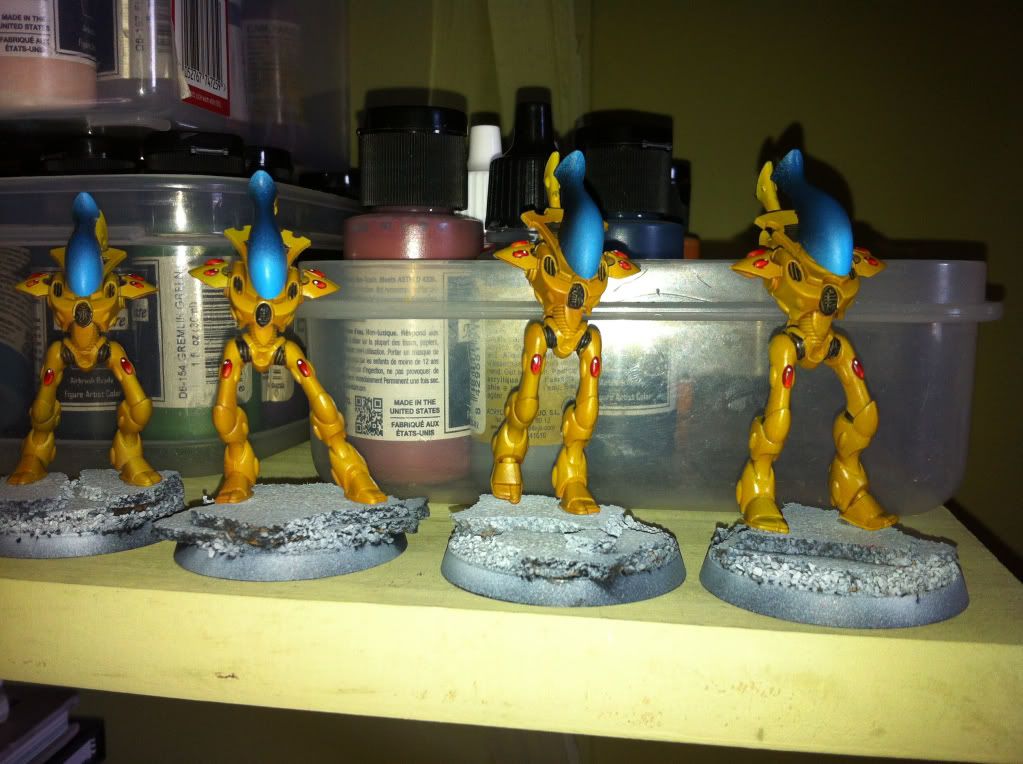
Using my Wraithguard as an example. I used a similar technique to how I painted my Waveserpants. 1st you need to decide if your going to fully build your guys or gals 1st or if like these models the helmets a different colour then it's best to paint those separately.
With marines I usually leave off shoulder pads, guns and heads as these are usually different colours. If not then leave them on.
If your models are fully assembled then it's no big deal, but your really better off painting the bits that are different colours by hand.
I follow these basic rules when airbrushing anything, infantry is no different.
1. What colours going to be the dominant colour your painting. Once you decide this you then want to pick a darker shade as your preshade. It can be a different darker colour but personally I go for a darker shade.
2. Grab your model and if it's already based, blu-tac the base to a cork or if it's not then you can blu-tac the feet of the model to the cork instead. I sometimes go with this second method as I usually airbrush my bases separately.
3. If your painting a lighter coloured model then your best priming in light grey or white, I prefer light grey. However if your painting a dark model like a Dark Angel then prime in black and forget about any pre shading. You won't need to (kind of).
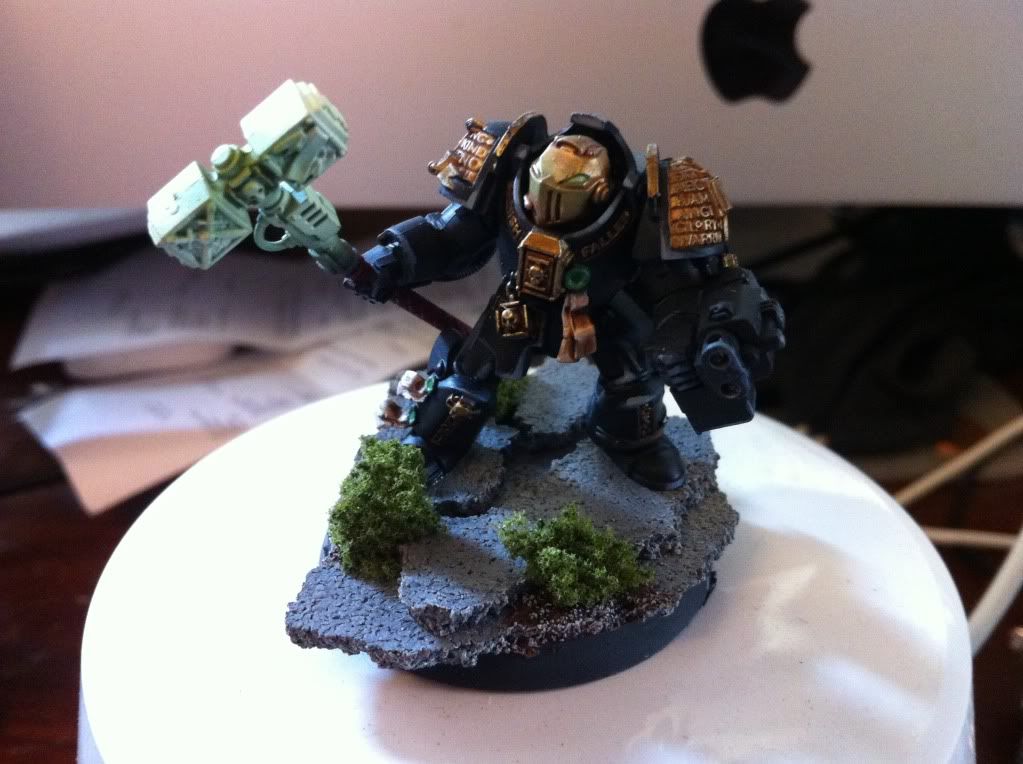
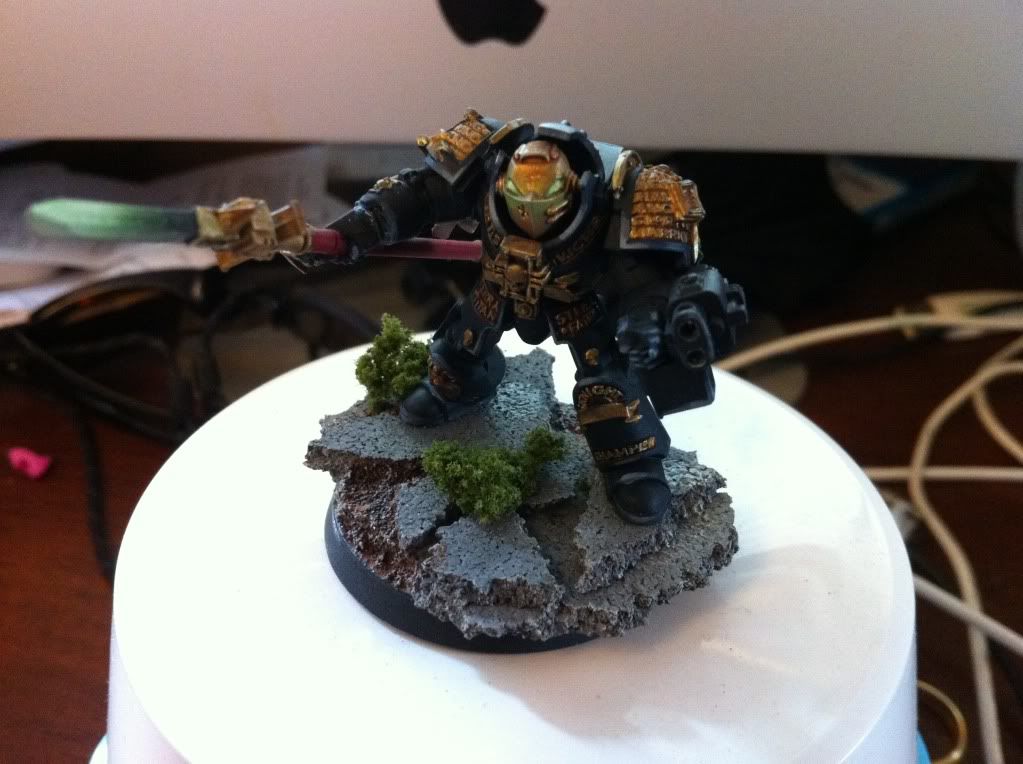
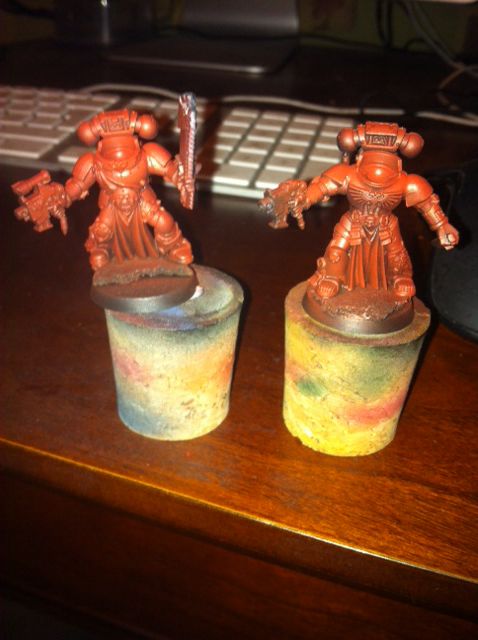
4a If you've primed in grey or white, now it's pre shading time. In this case my Iyanden are pre-shaded using Minitaires bloodstained mud. Try and be careful and paint anywhere you think would be darker or in shadow. Between the legs, under armpits, the gap between a back pack and the back of the armour. Anywhere you think your armour should appear darker. It does take a bit of trial and error but keep at it. Then switch to your main colour and paint your model. Once dry you can then go ahead and hand paint any details you need to. Mine looked like this
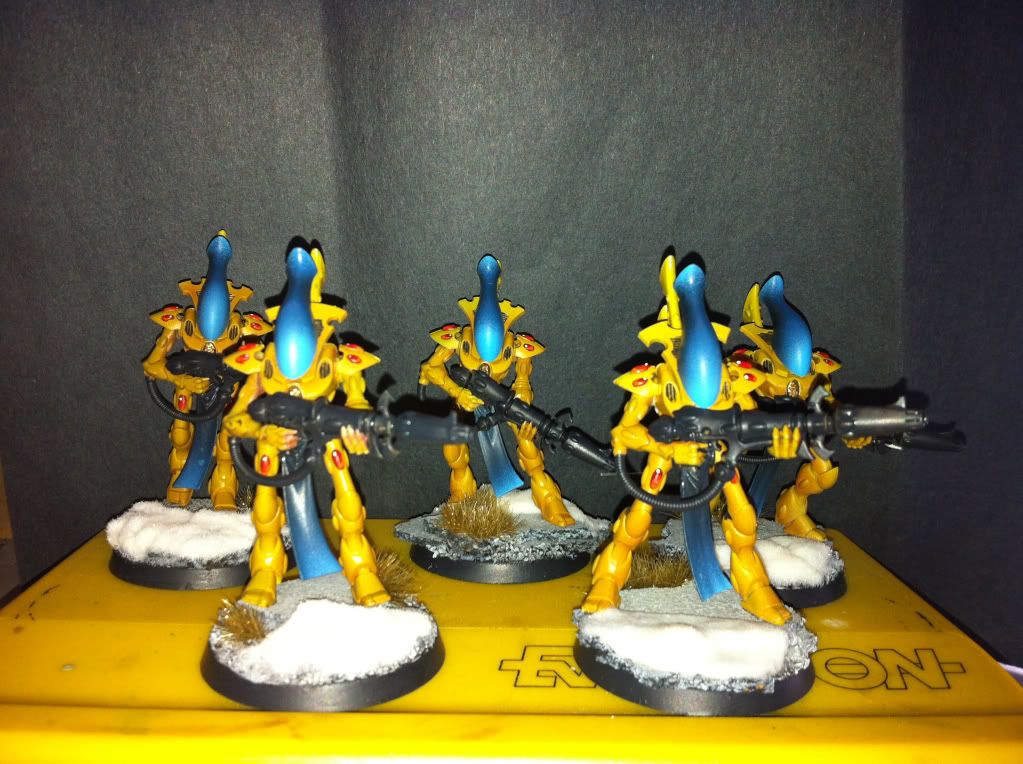
And once the arms had been painted on corks in the same fashion, the guns painted by hand and attached they ended up like this. Obviously the heads were painted separately then attached.
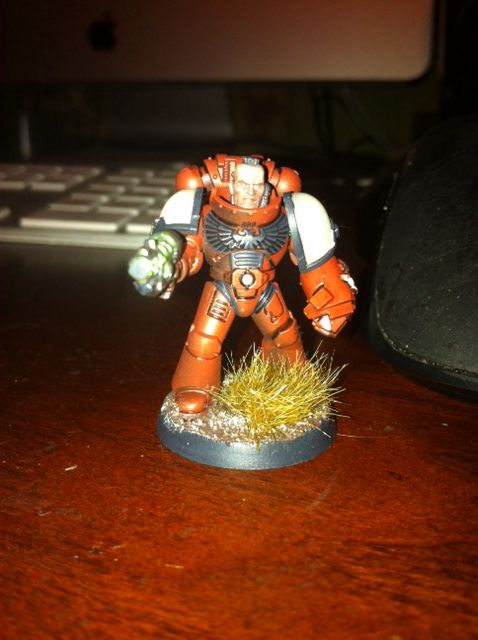
4b If you've gone for a black undercoat then now you need your pre shading colour, for example if your wanting a deep rich red colour. Prime black, then go for either a darker red than your final colour or even a dark brown. This should be painted using a technique called "Zenithal highlighting"
What this means is your going to spray your next coat of paint down onto the model from above and at an angle which paints most of the model but leaves areas like under the arms and between the legs still dark. This will lighten the upper areas of the model mimicking a light source. The final colour will then be sprayed on once the second colour is dry. You need to paint from an even higher angel above the model leaving some of your "pre-shade in the darker areas.
You will have something looking like this.
Which once finished off being painted by hand will look like this.
This technique works with all colours and even metallics. I use a wash by a company called secret weapon called "soft body black" and I paint this into the recesses of the armour and joints. I don't slap it on but go carefully.
This technique works on all colours. Just experiment with some duff or old models 1st.
I hope this helps you.
------------------------------------------------------------------------------------------------
I will go into shoulder pads, guns and heads and faces at a later date but I hope this gives you some idea on how to tackle airbrushing infantry.
BoLS Lounge : Wargames, Warhammer & Miniatures Forum
Results 21 to 30 of 47
Thread: Deadlifts Airbrush experiences.
-
11-06-2013, 03:03 PM #21Iron Father

- Join Date
- Sep 2010
- Location
- Vancouver Island, BC
- Posts
- 4,970

Last edited by Deadlift; 11-24-2013 at 03:10 AM.
http://paintingplasticcrack.blogspot.co.uk
-
11-06-2013, 03:15 PM #22Iron Father
- Join Date
- Sep 2010
- Location
- Vancouver Island, BC
- Posts
- 4,970
Blacks one of those colours that bothers me too, now you can just go with airbrushing the model black and edge highlighting it. Originally Posted by Bored Lyron

However I think there are other options. Minitaire make a colour called Raven Black, it has a very subtle blue tinge to it which I think is really nice. It's still black but far more natural than pure black primer. Another option is to use a colour called German Grey by Vallejo in its model air range. It's a very very dark grey and once dry you can wash it with badab black. This too will give you a very natural looking black armour on your men. Hope this helps.Last edited by Deadlift; 11-06-2013 at 04:10 PM.
http://paintingplasticcrack.blogspot.co.uk
-
11-07-2013, 04:04 AM #23First-Captain
- Join Date
- Nov 2013
- Location
- London, England
- Posts
- 1,551
Deadlift your airbrush work looks amazing, it's making me consider digging out my old airbrush and the compressor my Grandparents brought me earlier this year....
I just hope I can get results as good as yours....
One quick question, I'm looking to base my Spacemarines on a sand coloured scheme, any advice on how to go about using such a light colour?
-
11-07-2013, 09:45 AM #24Iron Father
- Join Date
- Sep 2010
- Location
- Vancouver Island, BC
- Posts
- 4,970
Recommended viewing.
Just a quick post to really give you guys some more reference on airbrushing your models. All the links below are from YouTube channels that I have been following over the past few years. They have helped me so much and I think for anyone looking to get into airbrushing they could help you too.
Schnauzerfaceminis
[url]http://m.youtube.com/channel/UCPtFEqSumWcgmmLsF6cyFhA[/url]
Ichibanpainting
[url]http://m.youtube.com/channel/UCdu8ZvFzRlCGSq1OU6FFmpw[/url]
Awesomepaintjob
[url]http://m.youtube.com/channel/UC0vYyCks8CDWZBHz-qtZhbA[/url]
Buypainted
[url]http://m.youtube.com/channel/UCsVtZ8SRClYf4tPzy8HjNtA[/url]
Once you get to grips with your airbrushing and surpass some of the basics I have written about, these guys and their videos will I hope inspire you as much as they have me.
There are of course many other guys out there with airbrushing tutorials but I think these 4 channels are the some of the best.http://paintingplasticcrack.blogspot.co.uk
-
11-07-2013, 06:05 PM #25Terraforming Magos
- Join Date
- Jul 2009
- Location
- The BoLS Batcave
- Posts
- 48
 This is only true if you're using a non diaphragm compressor with a short hose. With a 6'/180cm hose this becomes non existent. This is a problem of older compressors or compressors not designed for airbrush work. Tanks are nice mostly because they give the compressor a break and act as a primary moisture trap. Originally Posted by Deadlift
Best Army Appearance FOW- WAR Games Con 2010
This is only true if you're using a non diaphragm compressor with a short hose. With a 6'/180cm hose this becomes non existent. This is a problem of older compressors or compressors not designed for airbrush work. Tanks are nice mostly because they give the compressor a break and act as a primary moisture trap. Originally Posted by Deadlift
Best Army Appearance FOW- WAR Games Con 2010
Eternal WarGamesCon Paint Judge
FOW Line Judge WGC 2011
-
11-08-2013, 08:30 AM #26Iron Father
- Join Date
- Sep 2010
- Location
- Vancouver Island, BC
- Posts
- 4,970
Cleaning our Airbrush Part 1
Right then, we have done some painting and were finished for the day. We obviously shouldn't just plonk our airbrush down and leave the paint inside to render it useless for us next time. We need to give it a good clean. Takes about 10 or 20 mins maximum and its well worth the effort.
1st we need to flush any remaining paint out of our airbrush, I poor some water into the brush and turn up the psi to about 35. give it a good blast into your cleaning pot or onto some paper towel. I always go with my pot.
[URL=http://s844.photobucket.com/user/joenortonjones/media/IMG_1922.jpg.html] [/URL]
Next I take my airbrush out and dismantle it. whichever brand you buy your airbrush should come with instructions on how to do this. Some are easier than others but none are that hard. Heres my Harder and Steenbeck Evo stripped down. I have left the spring and trigger assemble in for this clean. its no issue to take it out and you only really need to if you need to lubricate it.
[URL=http://s844.photobucket.com/user/joenortonjones/media/IMG_1924.jpg.html]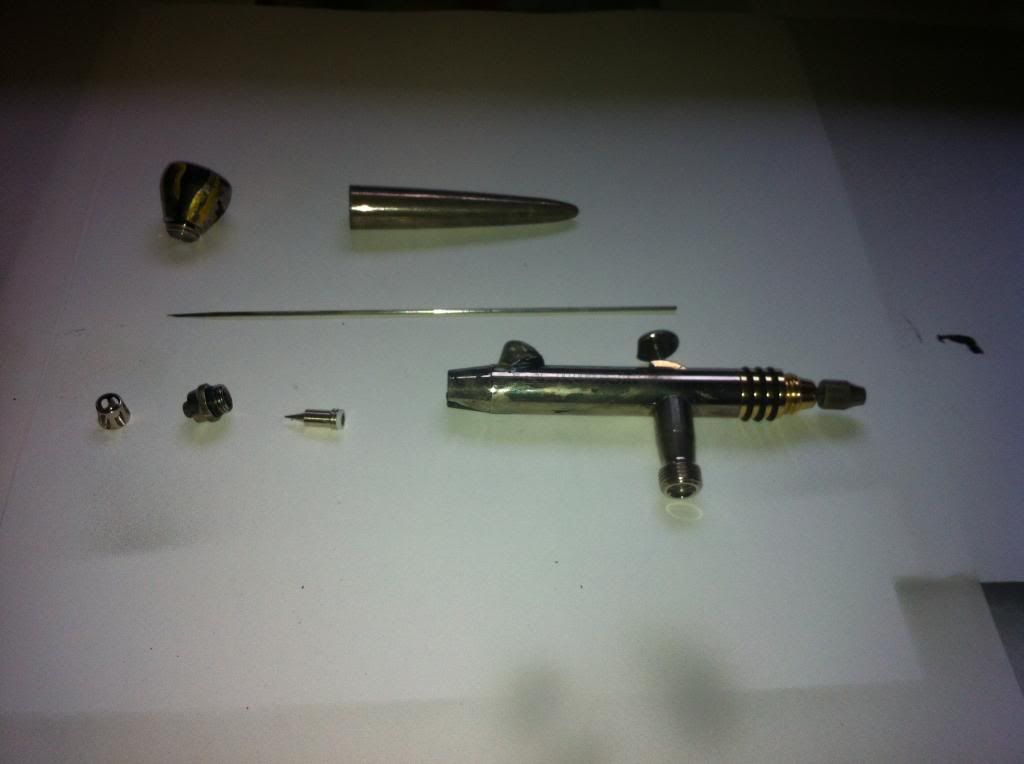 [/URL]
Now the next part can be done in one of two ways, you could get some clean water with a little dish soap and clean the individual parts by hand using a couple of airbrush cleaning tools like these.
[URL=http://s844.photobucket.com/user/joenortonjones/media/IMG_1927.jpg.html]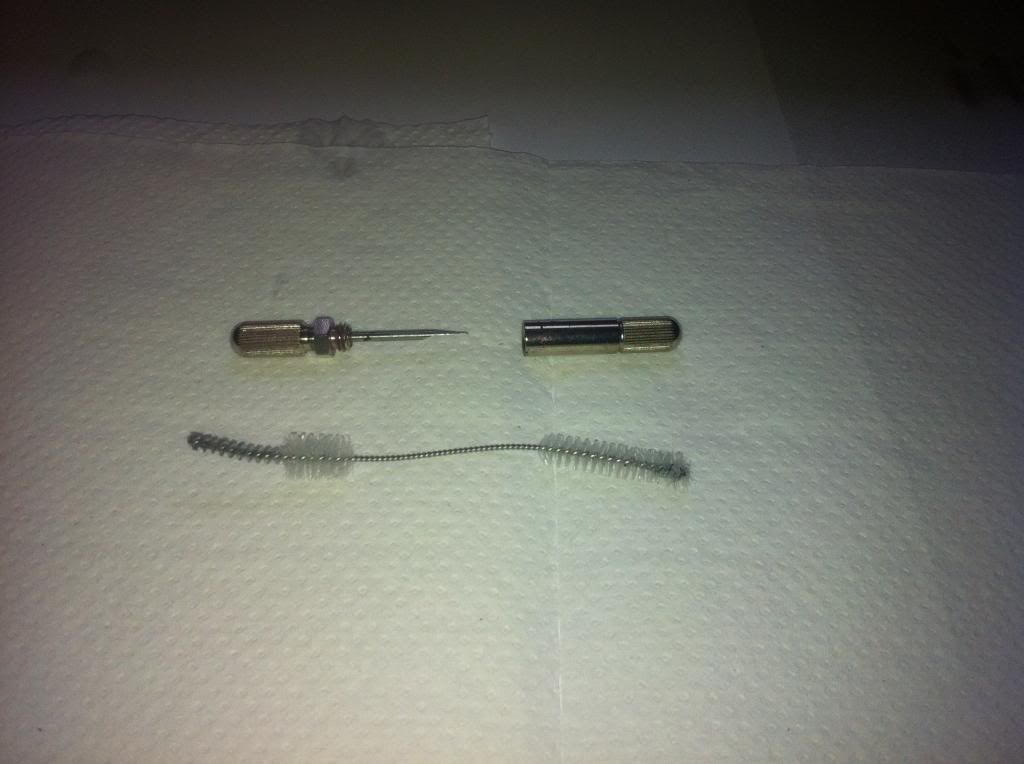 [/URL]
I do this as well, but whilst I am cleaning each individual part I also have the other parts vibrating away in an “ultrasonic cleaner” sounds expensive right ? Wrong mine cost £20 and its brilliant. If you have a partner who moans at just how much you spend on your hobby you can easily justify this expense as its great for cleaning jewelry too.
I just drop a little dish soap or washing up liquid in the machine then top it up with warm water. Carefully place your dismantled airbrush parts in and switch it on. Most have a run cycle of 3 or 4 minutes. I give mine 3 or 4 cycles as I am removing parts cleaning them by hand and plonking them back in. This is how I do it and its worked for me every time.
[URL=http://s844.photobucket.com/user/joenortonjones/media/IMG_1926.jpg.html]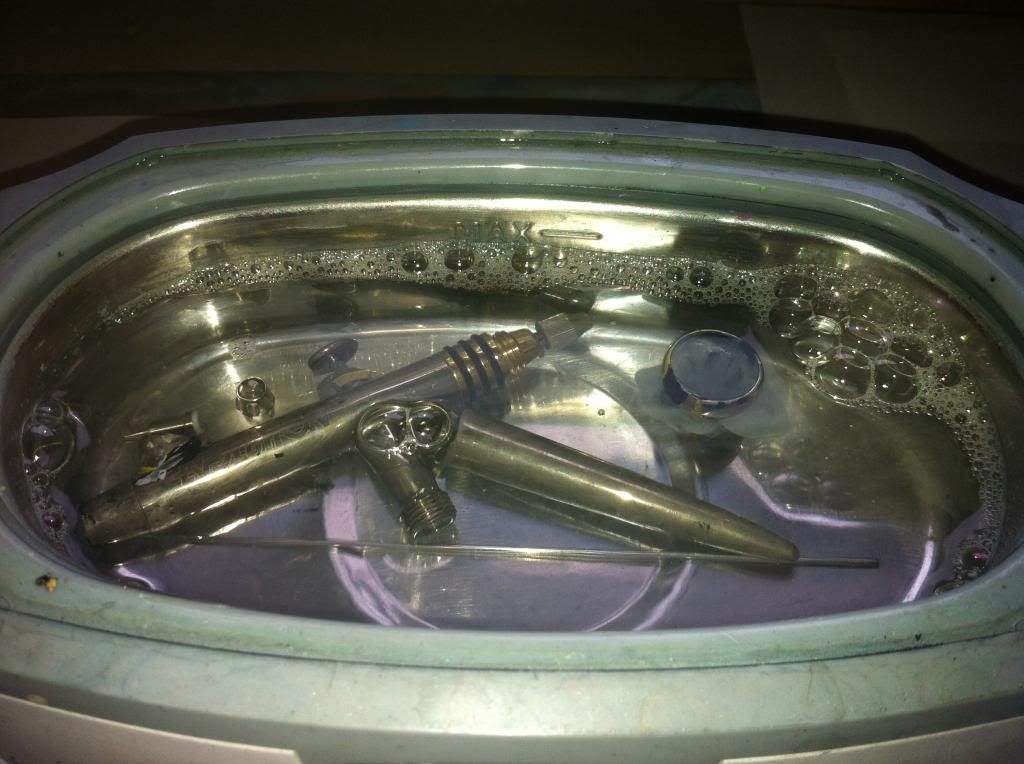 [/URL]
Its hypnotic to watch and basically the machine vibrates all the hard to reach bits of paint out of your airbrush.Last edited by Deadlift; 12-16-2013 at 10:25 AM.
http://paintingplasticcrack.blogspot.co.uk
-
11-08-2013, 08:33 AM #27Iron Father
- Join Date
- Sep 2010
- Location
- Vancouver Island, BC
- Posts
- 4,970
Cleaning our Airbrush Part 2
So our airbrush has been cleaned in the ultrasonic cleaner and we have scrubbed carefully with out little cleaning brush to get any flakes of paint out of our airbrush. Sometimes some areas of paint especially in the paint cap and nozzle area are a bit stubborn. If thats the case we could use some airbrush cleaner thats helps break down bits that are a pain.
In the top right hand corner you can see the Airbrush cleaner I am using at the moment. They are all really quite good. Vallejo do one that I would use again.
[URL=http://s844.photobucket.com/user/joenortonjones/media/IMG_1930.jpg.html]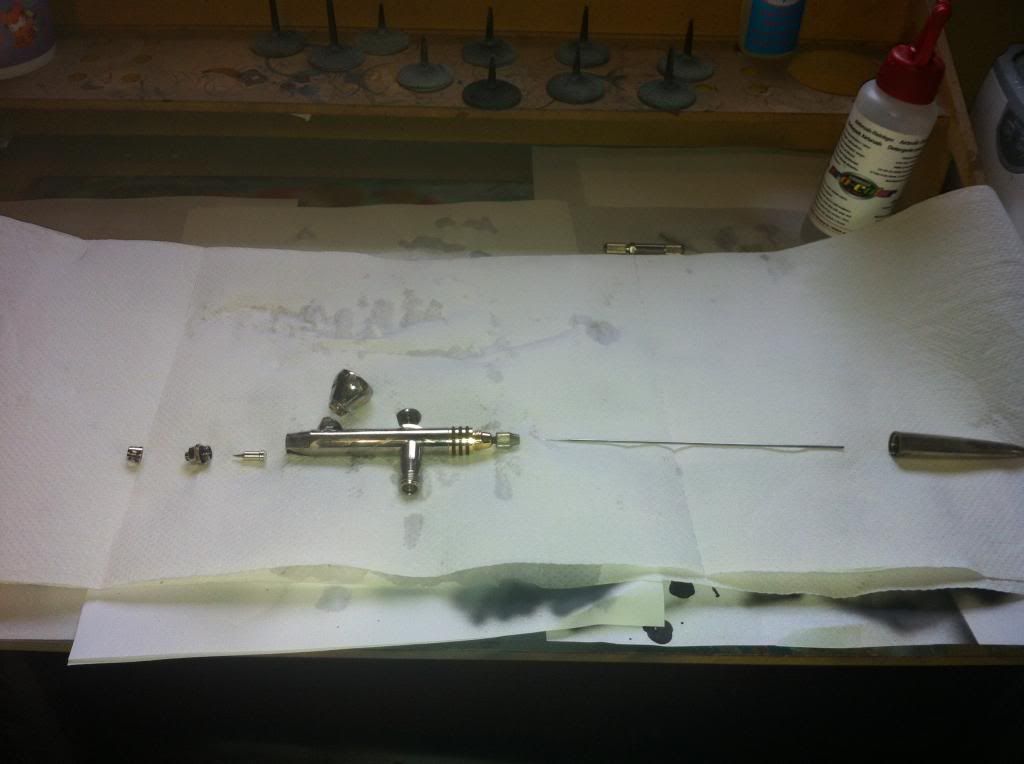 [/URL]
The Airbrush is now all clean and ready to put back together again.
1st we put the nozzle assemble together and screw that back onto the airbrush
[URL=http://s844.photobucket.com/user/joenortonjones/media/IMG_1931.jpg.html]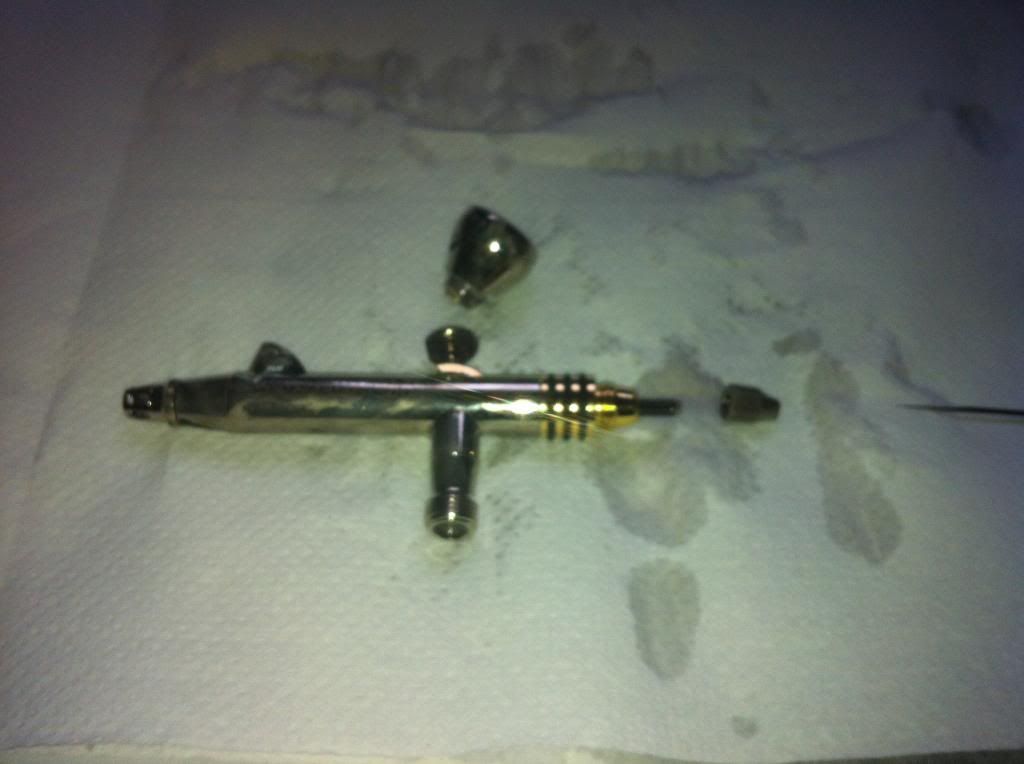 [/URL]
Then I reinsert the needle being very careful as its sharp.
[URL=http://s844.photobucket.com/user/joenortonjones/media/IMG_1933.jpg.html]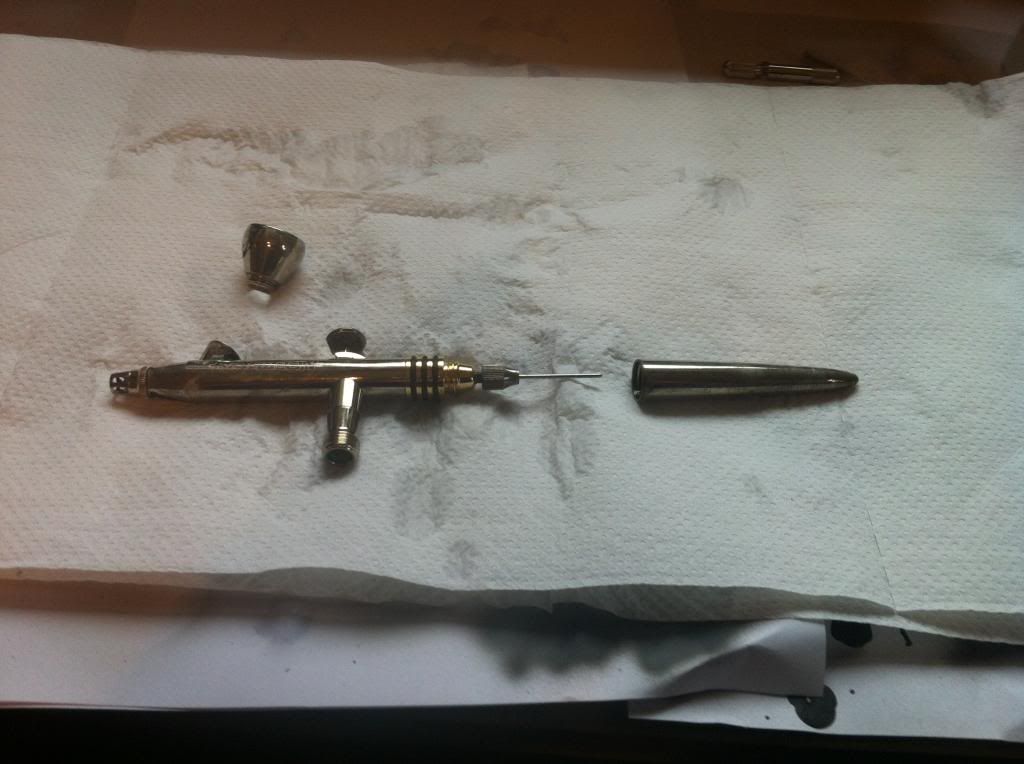 [/URL]
Then I screw the paint cap back on and the rear body or the airbrush. If the trigger is getting a little stiff the put a little drop of airbrush lube onto it.
[URL=http://s844.photobucket.com/user/joenortonjones/media/IMG_1934.jpg.html]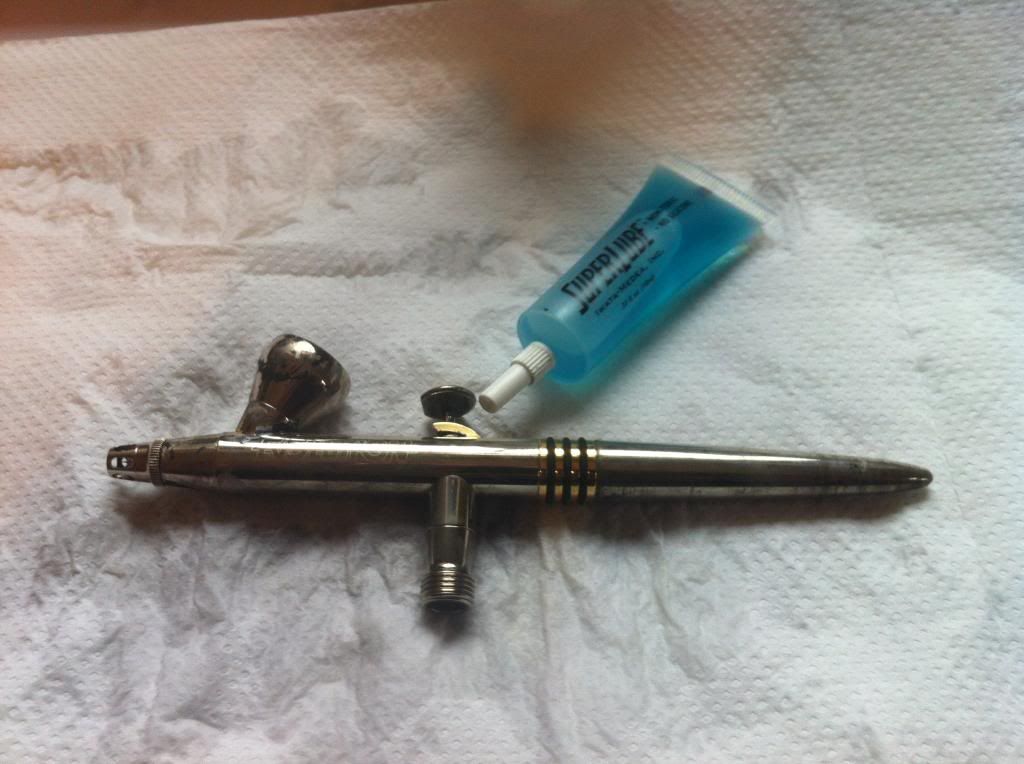 [/URL]
Then put your Airbrush away ready for next time. As I have said before I always flush mine out with water before use every time I go back to airbrushing.
Right then, I think I have covered all the basics. I will be back with some more “techniques” such as OSL, Zenithal Highlights and Ghost tints (Candy Paints) but for now thats it.
I would lastly like to say that there are many great brands of Airbrush once you feel you have outgrown your chinese generic. When you do it will cost you a bit more money, but look after your airbrush and its a great hobby tool. You will notice a huge difference in your painting too with a better brush.
Me I went with a Harder and Steenbeck after watching the Buypainted videos. Its splendid, very versatile and easy to maintain. I recommend it to anyone. The type I use is called the Evolution 2 in 1 and comes with 2 sizes of needle. 0.4mm and a 0.2mm and all the nozzles and caps too. Its £130 but really very very good. If I ever bought another this would be my choice again. You can buy spares for this airbrush too(as with others I am sure), so if you lose a nozzle or bend a needle it wont cost a fortune to replace.
Good luck with your painting and if just one of you guys gives it a go because of my posts then I am a happy man. I will be back with some demo marines and whatnot too. But for now with my impending house move and having to pack my hobby stuff, brains fried.
Cheers
DeadliftLast edited by Deadlift; 12-16-2013 at 10:40 AM.
http://paintingplasticcrack.blogspot.co.uk
-
11-08-2013, 02:18 PM #28Initiate
- Join Date
- Nov 2013
- Posts
- 1
very inspiring stuff cant wait for you to carry on.... ive created an account on here to follow this especially. I have been using an Iwata Neo but havent found the brush too good as it seems to clog very very quickly so ive bought a HS Evolution silverline 2 in 1 today. What compressor are you using? im using the one from amazon currently but feel like this could need updating to a better model as it seems to overheat quite quickly
-
11-08-2013, 05:37 PM #29Iron Father
- Join Date
- Sep 2010
- Location
- Vancouver Island, BC
- Posts
- 4,970
Welcome to the forums
 . The compressor I use is an AS186. Cheap as chips Chinese one but it's kept me going for the last 18 months without any problems. I think it's over heated on me maybe once or twice. Sorry to hear your having problems with your Iwata. I don't know the brand at all but it could be your paint needed to be thinned a bit more or had "lumps" in it. I found with my own brush that any problems I had were either solved with a damn good clean or as happened to me last week, my nozzle had a split in it.
Once again welcome to BoLs, it's a great community we have here.http://paintingplasticcrack.blogspot.co.uk
-
11-08-2013, 09:59 PM #30Brother-Sergeant
- Join Date
- Oct 2013
- Location
- Holy Terra - Australasia
- Posts
- 68
Is this stickied yet?
Would like some thoughts and feedback on sealing models with an airbrush, during painting (for washes) and sealing when complete. I'm using Tamiya atm and feel like there has to be a better brand/less fiddly option.
I also brought the whole Minitaire line and it came with varnishes too, I'm wondering what you thought of them and how you mix/clean using them?
Also, this thread rocks, thanks for all your efforts here Deadlift

 Reply With Quote


