

So got the wild idea to create a deadline for myself and make this diorama by the end of October. I have tons of bits laying around, including lots of orks and heads, I thought one day I could use them as masks, and the idea of my diorama, "Orktober 31st," was born. The idea is to basically have a whole bunch of the little green guys (in my mind, they're like "Despicable Me"'s minions, mischievous and hilarious) in lots of silly little vignettes, trick or treating along the way.
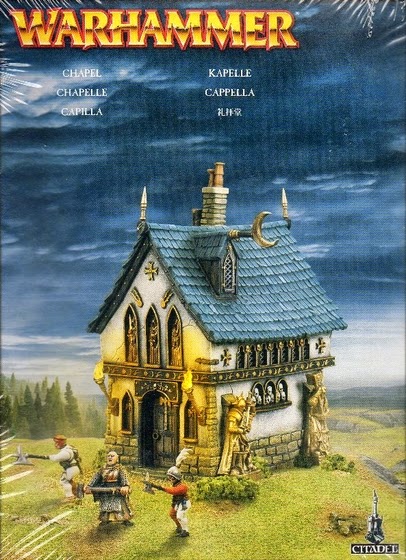
I had to start with a house, so I picked up the GW Chapel kit.
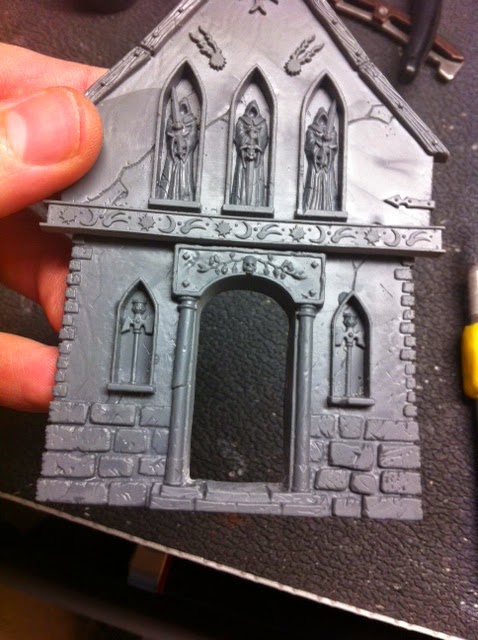
I wanted to give it a little extra life, so instead of having a static house with painted on fire, the idea was to do my first LED wiring job on a kit, and crack the door open to have some light spilling out while some ork was passing out candy. I started with the front face:
And dremeled the door out:
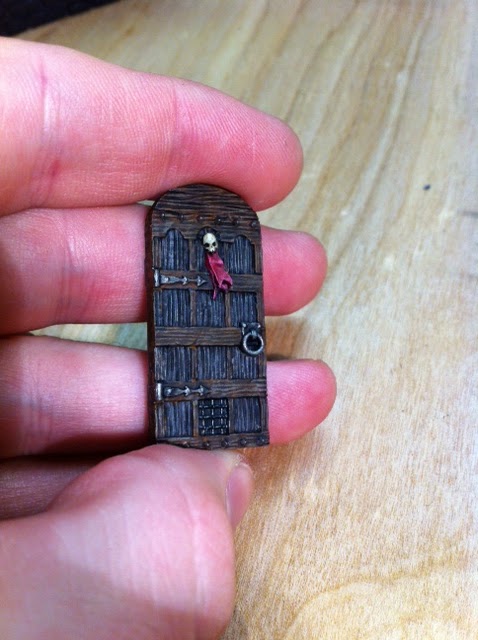
Then I painted up the "extra" door that comes with the kit, that's supposed to be glued on top of the other if you'd rather have different decor. Instead, I intend to glue it on and have it hanging ajar, but its easier to paint while its off the hinges.
More to come!!!
BoLS Lounge : Wargames, Warhammer & Miniatures Forum
Results 1 to 10 of 73
-
09-09-2014, 01:57 PM #1Veteran-Sergeant

- Join Date
- Aug 2014
- Posts
- 150
 WIP: Halloween-themed Ork diorama
Check out the blog of unceasing fun, defiantworkshop.blogspot.com!
WIP: Halloween-themed Ork diorama
Check out the blog of unceasing fun, defiantworkshop.blogspot.com!
-
09-10-2014, 06:53 AM #2Veteran-Sergeant
- Join Date
- Jun 2013
- Posts
- 136
This project is going to be a fun one to watch.
-
09-10-2014, 10:50 AM #3Veteran-Sergeant
- Join Date
- Aug 2014
- Posts
- 150
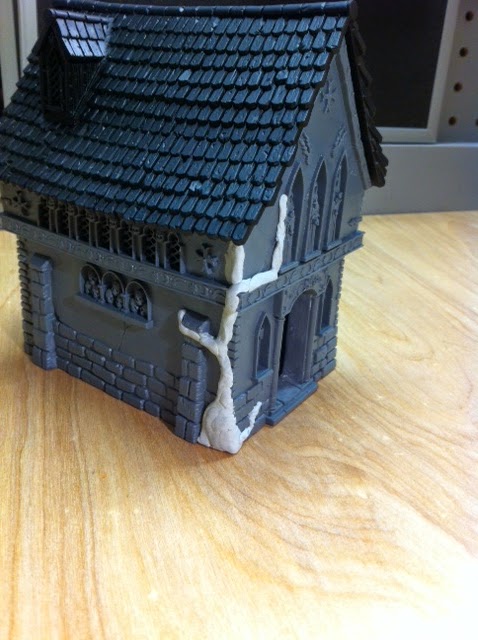
OK, next up is the assembly of the actual Chapel. As with all GW terrain pieces, the seam lines are gaptastic. And I hate seams. So, on to finding a way to bridge the Grand Canyon-sized gaps.
First up, actually gluing the four walls together to see what we have. As you can see in the pic below, there's a sizeable gap there, but if you look in the upper right corner of the picture, you'll see a great divide that an Olympic long jumper couldn't cross, in the beam area with all the runes and details:
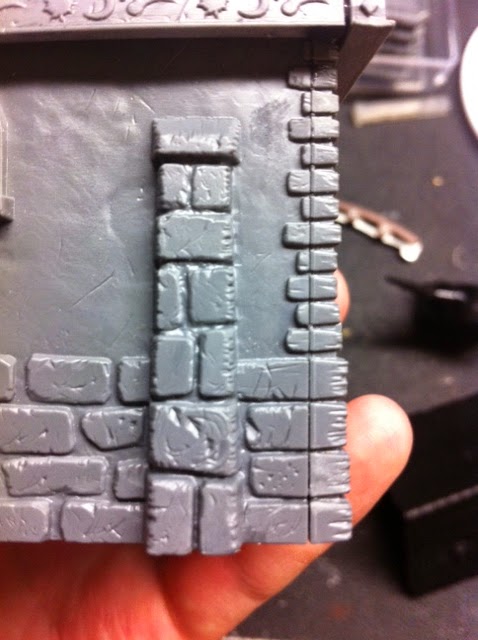
First thing's first, I have to take care of the cinder blocks, or bricks, or whatever. Instead of gap filling and sanding, I figured resculpting would be easier...just take a small ball of apoxie clay and spread it over, cut it at the edges, and pepper it with a bit of detail, and its way faster than filling each individual gap:
Put on a movie, and just sit and make little clay bricks on the corners for a bit:

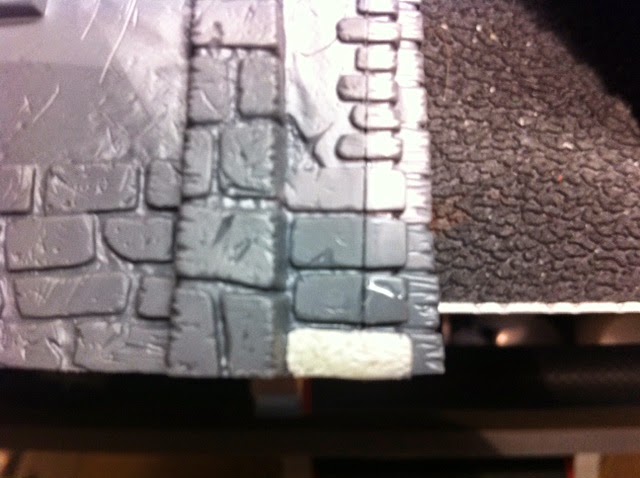
However, after a few corners of this, one does get a bit tired, so I decided to sculpt a base for some moss to be growing that is conveniently over the gap:
Finally, to take care of the massive gap in the I-Beam, I just clipped a piece of sheet styrene, placed it in the gap, and then trimmed to shape and melted it with a touch of styrene cement. I also shaved down the diamond-shaped rune on the end as you can see, and eventually replaced it with a small strip of styrene cut to the same shape and size, but didn't picture that.
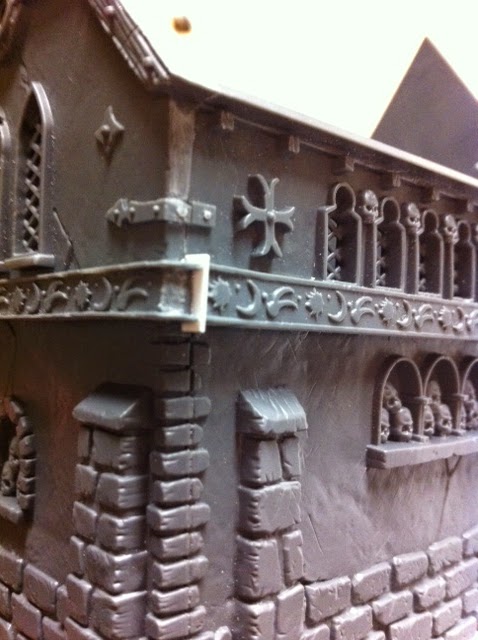
Also the corners above the rune-filled beam that have that buckle, I shaved the buckle down a bit, then replaced it with the same strip of styrene, then added small pieces of rod strips cut very small and glued in for the nails:

Thanks for looking!!!Last edited by defiantworkshop; 09-10-2014 at 10:52 AM.
Check out the blog of unceasing fun, defiantworkshop.blogspot.com!
-
09-11-2014, 04:25 AM #4Veteran-Sergeant
- Join Date
- Aug 2014
- Posts
- 150
OK, next up. The lighting. This is a begrudging aspect for me. I've always enjoyed seeing well-done lighting in models, yet I know NOTHING about LEDs, electricity, etc...other than it shocks you and as my kids say, you can see your bones if it does. So, I started researching, and came up more confused than when I started. So, fine, let's just smush some LEDs and wires together, shall we?
The box for the chapel shows a fire effect with their sconces, having some pretty good paint on the flames and some pretty good OSL effects on the chapel itself. I've tried my hand at OSL, but I figured I'd just let and LED do that for me instead. So, I decided to start testing some things after picking up some LEDs. Originally, I was going to just cut the fire off of the top of the sconces, and thread the LEDs into that area, but alas, the stems on the actual LEDs were thick enough to not fit back down a small styrene tube. I found a larger tube that it did fit down, but it was ridiculously disproportionate. So, I essentially hacked up the original plastic and had to toss it. Bah. I was frustrated, so no pictures at this point.
I figured now, I have to make my own torch holders. I dug around my bits box and found some clear plastic rubber feet that were have spheres. I drilled a hole out, painted them black, and used them as a test. Anyone who's seen my [url=http://defiantworkshop.blogspot.com/2014/06/model-showcase-witch-kingnazgul-from.html]Witch King[/url] kit knows I really like the flame effects you can get from, of all things, Water Effects. So I added a smattering of Water Effects on top of the hole I drilled and painted it clear orange and yellow.
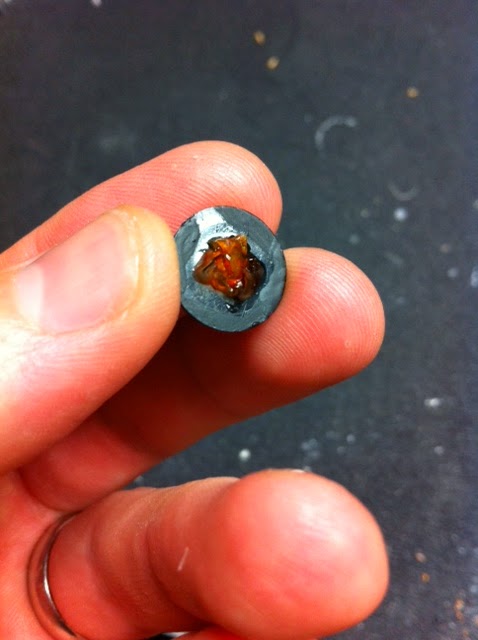
From there, it was a simple task to just shove the LED up in there and attach the wire to a battery to see the effect, which is terrible on camera:

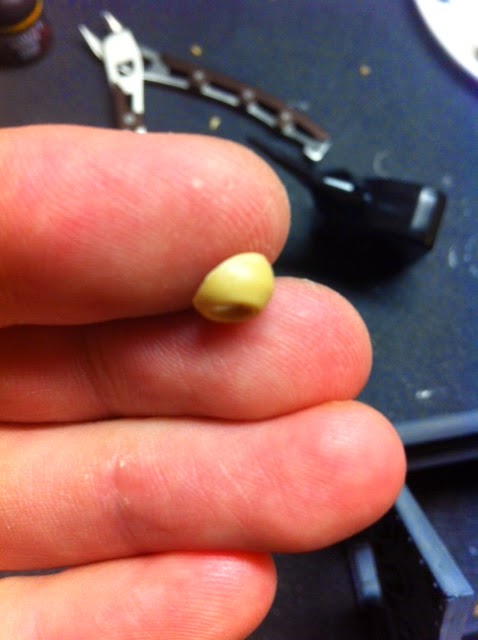
However, about halfway through the process I also discovered that the rubber foot was phenomenally disproportionate as well. It was just way too big for the effect of what I needed. So, back to the parts bin, where I discovered bits from an old Tamiya tank I did way back when. Not sure what parts these were, but they were circular, scooped inside, and just the right size:

Just a simple matter of clipping those "wings" off the top and drilling up through the bottom, and voila, a torch holder:
Just slapped a bit of Leadbelcher paint and a heavy wash to make it more "cast iron" looking and it was ready to go. The styrene tube is still just way too thick to look believable, so I think I'm going to sculpt some putty around the LED stems and paint it to look like large tree branches, maybe?Check out the blog of unceasing fun, defiantworkshop.blogspot.com!
-
09-11-2014, 04:39 AM #5First-Captain
- Join Date
- Jul 2009
- Location
- London U.K
- Posts
- 1,924
I'm looking forward to more

-
09-11-2014, 08:39 AM #6Veteran-Sergeant
- Join Date
- Aug 2014
- Posts
- 150
Well, ask and you shall receive.
Next is to shore the roof up. Gotta paint some time, procrastination isn't paying off if I wanna make my deadline of displaying this on Halloween.
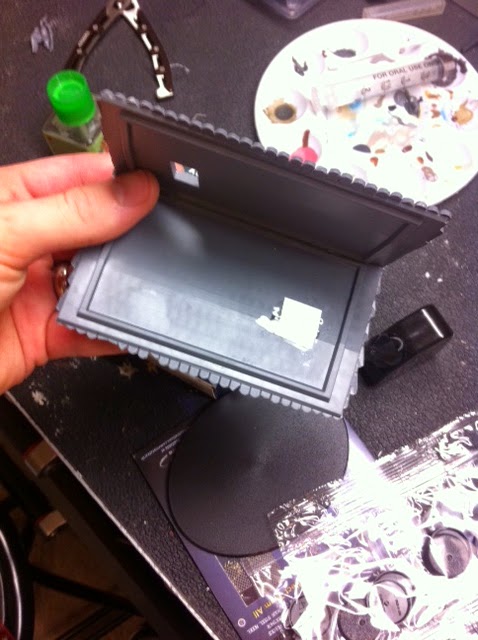
So, thinking along the LED front, I have some work to do. I want the light to shine out of the windows, but the inside of the Chapel is just a big box. There's nothing there that will hide the wires, and there are some gaping holes in the roof, plus seeing in the windows might detract from the overall aesthetic if you see wires and LEDs. So, I started by patching the roof with some sheet styrene and overkilled it using some foil tape to totally block any light bleed.

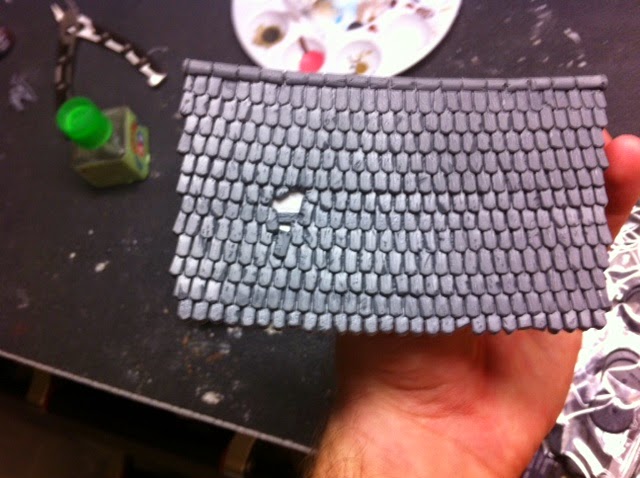
From there, it was fairly straight forward. Prime in black, and let your brain figure the gaps out. I also primed the actual Chapel while I had the can out. I then made up a match of paint in various shades based around a clay/terra cotta style, adding a bit of yellow or brown here and there in the mix to make the shingles:
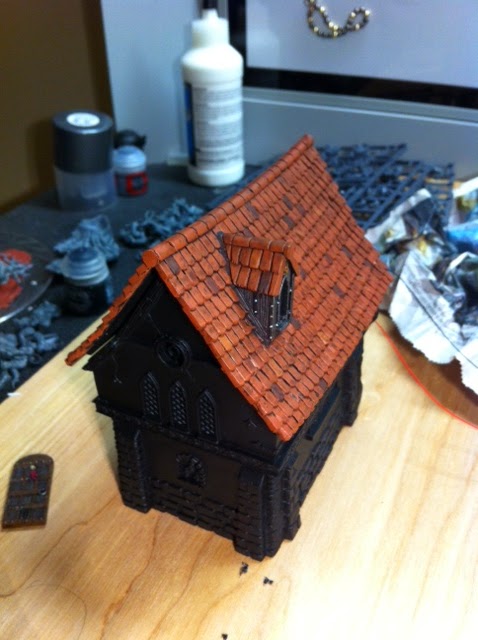
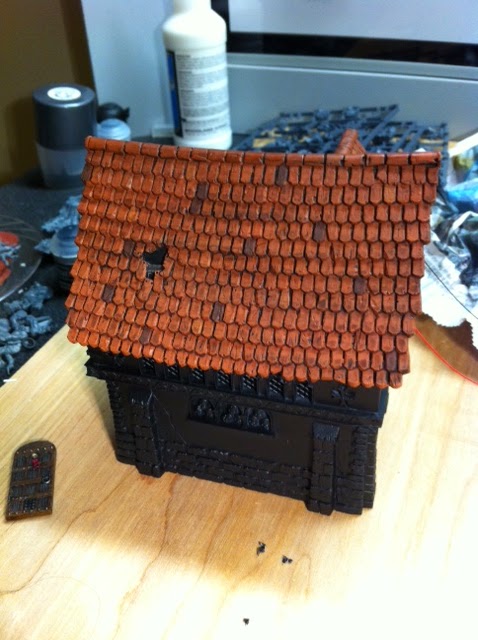
Been messing around with how the windows will show the light. Might do something interesting there once I'm more confident in my LED abilities. Thanks again for looking!!!Check out the blog of unceasing fun, defiantworkshop.blogspot.com!
-
09-11-2014, 08:42 AM #7Chapter-Master
- Join Date
- Aug 2009
- Location
- Ohio
- Posts
- 2,460
I love that you took the time to correct the gap issues these terrain features have. I'm enjoying watching your progress with this project. I haven't tried working with LEDs yet so I'll be interested to here how bad you find them to work with.
My Truescale Insanity
http://www.lounge.belloflostsouls.net/showthread.php?48704-Truescale-Space-Wolves
-
09-11-2014, 09:09 AM #8Veteran-Sergeant
- Join Date
- Aug 2014
- Posts
- 150
The LEDs haven't been atrocious. Though, I have some serious wire management to do. My plan is to create a "ceiling" for the piece that will house a downward facing light and also hide the wiring and battery. We'll see.
Check out the blog of unceasing fun, defiantworkshop.blogspot.com!
-
09-11-2014, 02:24 PM #9Veteran-Sergeant
- Join Date
- Aug 2014
- Posts
- 150
OK, quick update. Got around to trying something interesting out. There's an alcove in the roof that has a grate on it, or maybe more akin to Warhammer burglar bars? I dunno. Anyway, whatever they are, you can see through them. Into my jumbled mess of LED wiring. All of the windows look like this, but I have plans on the side and back windows, and didn't think an attic window should really match them. Attics are scary. Let's make this one scary.
I started by clipping, X-Actoing, and sanding away the grate on the window:
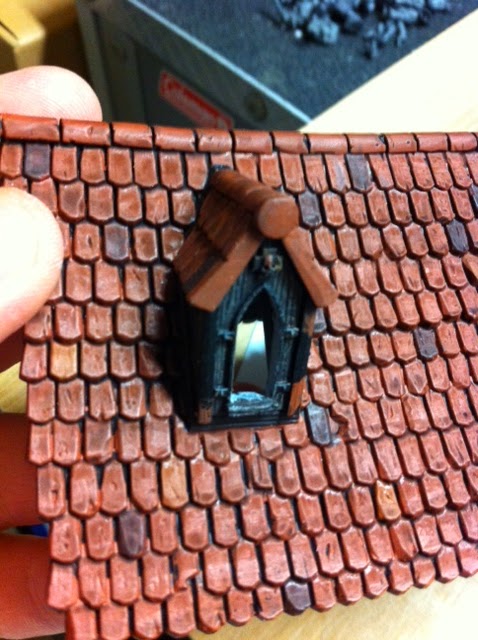
Originally, I was going to just put some clear styrene up and call it a day. But just clear styrene is even worse than the grate. Its so clear you can't even see its there, and now the wires are way way more exposed. So I took some 220 grit sand paper and sanded both sides thoroughly to make it translucent. But something was lacking (besides the lack of photos at this stage, sorry!). Since the LEDs looked so good in testing, I was going to light the attic as well, but I didn't buy enough LEDs, so I just tested it with the orange I have on hand that will eventually go in the torches on the house. I went a bit further and cut out a silhouette (based on the famous "Nosferatu" shadow scene) and glued it to the window. The end result:

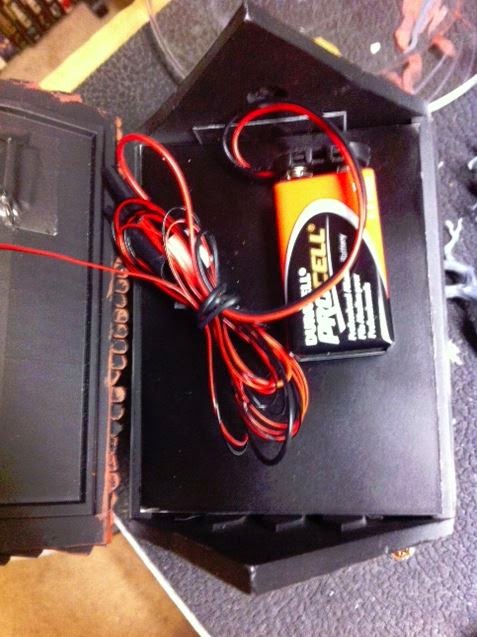
Finally, before I can call the roof section complete, I sprayed a sheet of styrene black, and glued it to the top of the walls in the Chapel to serve as my on/off switch access and battery compartment. I've gone out and bought my yellow LED to use as a candle in the window, and that and the torches will all be "flickering" LEDs to help convey the sense of flame:
 Check out the blog of unceasing fun, defiantworkshop.blogspot.com!
-
09-11-2014, 03:11 PM #10Chapter-Master
- Join Date
- Aug 2009
- Location
- Ohio
- Posts
- 2,460
Very nice! I never thought about how big the wire/battery would be. Looks like it will tuck away nicely in the attic.
My Truescale Insanity
http://www.lounge.belloflostsouls.net/showthread.php?48704-Truescale-Space-Wolves


 Reply With Quote


