
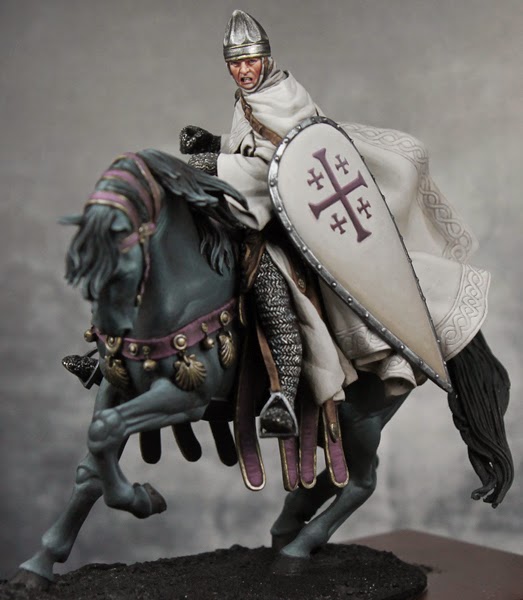
For the past couple months I've been working on my entries for the Crystal Brush painting competition (coming up at Adepticon next month). There have of course been other projects, but now that it's getting close I'm putting all other projects off to the side. I've gotta finish my entries before it's too late. Here is a sneak peak at one of the four figures I'm hoping to enter, a 54mm Knight of the Holy Sepulchre.
This has been a long term project of mine. I actually started it over a year ago. It's a complicated figure and the paint scheme I went with was a tough one (lots of black, white, and design work). So when I ran into trouble, something I was trying didn't work out as well as I'd like, I'd just set the figure aside for a few months and come back to it later with a fresh perspective. It's not quite finished, but he's close. Here's a look at how it progressed...
The early focus was the rider. I left the cape off so I could paint his back and details along his left side.
The banner was an interesting project. I wanted to stick with a more or less historical paint scheme, so the design had to be the order's cross pattern on a white background. But that left a lot of empty space. So to keep it from being boring, I put in a subtle white on white pattern.
With the body mostly finished, I attached the rest of his cape. The figure has a lot of white, which is a tough color to work with. To do the shadows I used brownish off whites instead of grey. He's wearing natural material, so it makes sense that you wouldn't get these perfectly neutral grey shadows. The next step was to tackle the horse. To contrast with the white, I wanted to do a black horse. This gave me a lot of trouble and I ended up setting the knight aside for about half a year before feeling confident enough to try again.
When I finally felt ready, I went with a blue-black for the horses coat. Like with the white, I'm avoiding grey is I can. Instead I go from black, to a deep blue, and then start to mix in a light skin tone to create the highlights. You'll notice I also began to add a border design to the knight's cape. Just like with the flag, there's a lot of white space and I wanted to do something to make it a little more interesting. I figure a simple border design could still be historically accurate (or at least historically plausible).
I continued to do more of the horses coat and then turned to the equipment. I decided to use the same red-purple as the design on the banner to help tie things together. I also really liked how that color looked next to the blue-black of the horse.
With the horse close to being finished, I finally glued down the knight (he'd just been resting on there for the photos) and then attached his shield. As with the banner, I painted on the cross pattern freehand.
And here's a quick look at the other side of the figure where you can see the knight's armor. In the image at the very top of this post you can see that I've also finished up the border pattern of the cape, continuing it up along the side and on the front. There's still plenty to do (horse's tail, hooves, eyes, and reins, the reverse side of the banner, the base, and then weathering), but I'm hopeful this project will be wrapped up by the end of the month.
If you're curious to see more detail on how I did this figure, just ask or check out my painting site (link below). I will also post additional images as I take care of the finished touches on this piece.
[URL="powellminipainting.blogspot.com"]Powell Mini Painting[/URL]
BoLS Lounge : Wargames, Warhammer & Miniatures Forum
Results 1 to 4 of 4
-
02-17-2015, 10:03 AM #1Battle-Brother

- Join Date
- Mar 2013
- Location
- Los Angeles, CA
- Posts
- 43
 Preparing for Crystal Brush - Mounted Knight
Last edited by The Girl; 02-17-2015 at 09:54 PM. Reason: added live link
powellminipainting.blogspot.com
-
02-19-2015, 11:20 AM #2Battle-Brother
- Join Date
- Mar 2013
- Location
- Los Angeles, CA
- Posts
- 43
Thanks for the link fix!
This figure has a lot of white space so I wanted to add some extra details to make it a bit more interesting. Here's how I put the border design on the cape. It's a repetitive design so it's important to keep the design spacing as consistent as possible. When just doing it by eye it's easy for distances to gradually get longer or shorter. To help I began by measuring out the distance between loops and marking them with small dots up the side of the cape (about 3 mm between each).

Next I start to lay in the first parts of the design. Just pick a small part and repeat it (this also helps keep things consistent). I picked half of the loop. Notice that the line passing through the far right dot will be slightly offset from the left dot.

Then I put in the other side of the line, going through the left dot. I follow the existing line and try to keep the spacing constant.

The design is mostly there but not quite. So now I fill in the rest of the pattern. If needed I make adjustments so the portion passing under the other section will look like it meets up. The lines are a bit rough but that's okay, think of this as a sketch.

Now we use the background color to go in and clean up the lines. Carefully paint next to the lines to thin them down going section by section. The more time you take, the nicer the end result will be. Finally I applied some layers of lighter and darker glazes to add some shading and help blend everything together.
 powellminipainting.blogspot.com
-
02-20-2015, 09:21 AM #3Battle-Brother
- Join Date
- Feb 2015
- Location
- Kansas City
- Posts
- 35
My jaw is having trouble leaving the floor right now, masterfully painted and that is some of the best free handing I've seen in a while.
"Warm it up, everything you've got. C'mon you apes, you wanna live forever?"
-
03-04-2015, 12:18 PM #4Battle-Brother
- Join Date
- Mar 2013
- Location
- Los Angeles, CA
- Posts
- 43
Thanks! This piece is just about finished. I'm still waiting on some groundwork stuff to arrive so I can add a little bit of vegetation to the base, but that should get here by the end of the week. Since the last post I created the reins for the horse (only the end by the horse's mouth came with the kit, the rest is metal foil cut to size) and I finished and attached the banner. A small base came with the figure, so I used some plaster to extend it to cover the entire wooden base and used some sand for texture. Finally I used some pigments to create some dirt and dust for the figure to help give it some history. I didn't want to go overboard with this, but I needed a certain amount to ground it in reality. In addition to the dirt I used some Tamiya Clear Red for some blood stains on the shield and a few drops on his clothing. Just a few little touches left and he'll be ready for the competition!


 powellminipainting.blogspot.com


 Reply With Quote
