

Some of you may know, I really dig Games Workshop's terrain. Some of it is awful (from a model kit perspective) and only makes sense in a wargaming scenario. Some of it just looks fun to paint, and you get more plastic for your money with the terrain than most any other kit sold. So when I saw this small compact box the other day at my local store, I decided to pick it up on a whim.
Like most GW terrain, its a chunkier plastic with large mold lines down the edges. Some quick clean up while watching the Panthers game (9-0!!!!), and I was done. Cleaning mold lines like that gives you an intimate knowledge of the kit...where the fits are, what the problem areas will be, etc. So while tossing them around, and noticing that the bottom of the pieces were hollow (to save money in casting). I didn't want the hollowness to be visible if you got up close to it...it takes you out of the "experience" of a model to see the magic broken. You realize you're looking at painted plastic instead of a small piece of real terrain. So I decided to fill it.
Since the piece is supported to one side off-kilter instead of center, weight and balance were a major consideration. So instead of filling with a clay putty like Aves (which can do some really cool texture things, but would double the weight of the top of the kit), I decided to use sheet styrene to fill it. First I traced the outline of the piece roughly and cut it out of my thinnest sheet:
I also started cutting out smaller strips and gluing them under the steps to hide the hollow parts, and when the glue dried, trimming it with an Xacto and sandpaper:
After test fitting the top part, I realized doing a large disk wasn't ideal for such a complex shape, so I trimmed what I had cut out into smaller pieces:
I then took Vallejo Black Lava paste on the bottom to add texture to the unfinished pieces. You'll maybe never, ever see it....but I know its there. The terrain is no longer hollow on the underside and looks....finished.
Next, I'll get started on the actual paint job!
BoLS Lounge : Wargames, Warhammer & Miniatures Forum
Results 1 to 10 of 12
Thread: Dragonfate Dais WIP
-
11-16-2015, 08:03 AM #1Veteran-Sergeant

- Join Date
- Aug 2014
- Posts
- 150
 Dragonfate Dais Complete!
Last edited by defiantworkshop; 11-27-2015 at 10:04 PM.
Check out the blog of unceasing fun, defiantworkshop.blogspot.com!
-
11-16-2015, 01:10 PM #2Veteran-Sergeant
- Join Date
- Aug 2014
- Posts
- 150
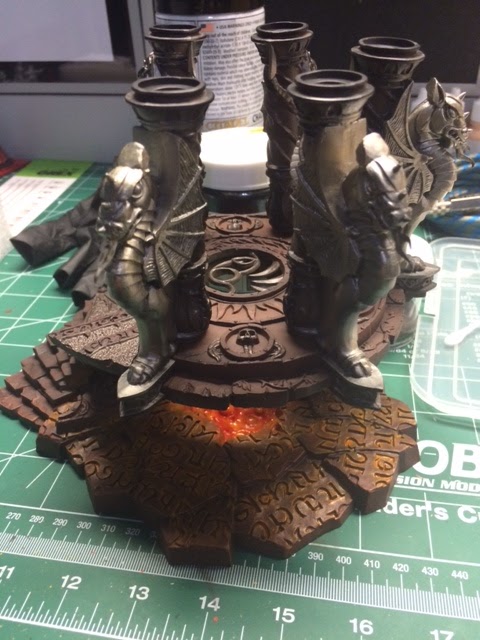
So getting back to where we left off from last time. The glue is dried on the "skeleton" base we put down last time. I then took Vallejo Black Lava paste (a texture paint) on the bottom. You'll maybe never, ever see it....but I know its there. The terrain is no longer hollow on the underside and looks....finished. That's the top picture you see.
So next step was to lay on some paint. Most of the pictures Games Workshop has of this is a dark gray color scheme, a very "cold" color. So instead of duplicating what's already been done, I decided to venture into unknown territory and go with a warmer tone, and paint in browns and oranges. Instead of the typical "pool of blood" I've seen, it meant doing a pool of lava. I started with a brown base, sprayed a warmer reddish brown to highlight, and some black to shade the recesses. Then I started to base the lava with white:

After that, I added some yellow to the mix, then some orange. While I had the orange loaded in the airbrush, I sprayed the runes in the ground to give them a "glowing" effect. Then I added some reds to the lava. By now my compressor was getting pretty warm, so I had to stop before adding the black the give the lava that "cooling" look. I might just do that with pastels, I haven't decided yet.

While the colors were loaded, it was a good time to start with the ambient, OSL lighting. I just did rings with the colors on hand, yellow in the middle, going to orange, red and brown to the edges. I also made sure to pay attention to how the light would fall on the stairs.

So with that getting close to finished, it was time to paint the dragons and the columns. I wanted an aged bronze look, and not that shiny kind of bronze, but that dulled finish kind. I mixed up a custom color consisting of Rhinox Hide, Calliban Green, and Leadbelcher to get the color of the columns (there's a slight sheen to them that the iphone isn't the best at detecting) and airbrushed Alclad Titanium Gold onto the dragons themselves. I'm not sure if I'm completely happy with the colors. By themselves, the parts look good, but I'm still undecided about if the colors match the palette I've picked out or if I need to "warm" the dragons up a bit.

And here's a quick mockup of where it stands at the moment:
Thanks for looking!!!Check out the blog of unceasing fun, defiantworkshop.blogspot.com!
-
11-16-2015, 04:49 PM #3Brother-Sergeant
- Join Date
- Feb 2011
- Location
- Canada
- Posts
- 69
That looks fantastic. Not overdone, nothing super complex, just lots of care and effort in the right places. Makes for a properly finished piece, I can't wait to see it completed.
-
11-17-2015, 04:03 AM #4Brother-Sergeant
- Join Date
- Aug 2015
- Posts
- 73
I'm also working on the Dias and I too believe the dark grey paint scheme just doesn't sit right.
Best to paint it in pieces first, like you have done and then piece it together as you finish.
Yours is coming out very nicely and am looking forward to see it finished.
-
11-17-2015, 06:52 AM #5Veteran-Sergeant
- Join Date
- Aug 2014
- Posts
- 150
Thanks guys! Ray, can't wait to see yours as well! I have, however, encountered a major stumbling black toward completing this. Its called Fallout 4. Working toward finishing soon though.
 Check out the blog of unceasing fun, defiantworkshop.blogspot.com!
-
11-18-2015, 09:45 AM #6Veteran-Sergeant
- Join Date
- Aug 2014
- Posts
- 150
Just some quick hit updates, since I only had about 30 minutes to work on the kit last night.
As you can see, I've changed the color of the dragon statues. The titanium gold color I used looks really good in the bottle, and looks good on the dragons, but even though its a brownish/greenish gold color, by comparison it looked silver next to all the browns. It was just too light. So I've decided to deepen the color and make it a bit warmer by basing them with Balthasar gold. I'm unsure where I'm going from here with it, but I'm happier with the overall look of it.

Also, last time, my airbrush compressor was getting a little warm from use doing the lava and runes, so I stopped before adding any darker colors. I only had a limited amount of time to work on the kit yesterday, so instead of setting the airbrush up (which means cleaning it after, which is the real time consuming part), I used black chalk pastels to add a cooling lava effect. You can immediately tell a difference once its applied on only a few of the bubbles:

And finally, I added it to all of the bubbles, and most of the raised spots, and it adds a lot of depth to the lava pieces:

I've started on the flames (or smoke or whatever) that goes on top of the columns, but that will be a post unto itself later. Thanks for looking!Check out the blog of unceasing fun, defiantworkshop.blogspot.com!
-
11-18-2015, 10:22 AM #7Brother-Sergeant
- Join Date
- Aug 2015
- Posts
- 73
I'm a notoriously slow painter, so it won't be soon. Originally Posted by defiantworkshop

- - - Updated - - -
Looks good to me, doing a great job. The base is especially nice! Originally Posted by defiantworkshop
As far as the dragons go, I've had the same problem. I'm painting my Dias in a light greyish stone color and was going to paint the dragons gold. After finishing the base (I'm working on the stairs at the moment), I decided to go with a brass color on all the decoration such as the leafing, skulls, etc. I'll probably end up going with a stone color for the dragons so as to not make it too busy, but it is a bit of quandary. We'll see when I get there, I guess.
Until then, will be watching your progress with great interest.
-
11-19-2015, 07:37 AM #8Brother-Captain
- Join Date
- Aug 2009
- Location
- Perth, Australia
- Posts
- 1,220
The shaded pool before you added the reds and oranges was interesting. I thought at first you were going for a pool of liquid starmagic or quicksilver or something of that ilk.
Kabal of Venomed Dreams
-
11-19-2015, 10:23 AM #9Veteran-Sergeant
- Join Date
- Aug 2014
- Posts
- 150
Morgrim, that would've been interesting...though I imagine I'd end up spending a lot of time explaining it? Seemed most people used blood as the liquid of choice. I wanted something recognizable but not usual. Almost went with a Nurgle's Rot slime pool but decided the "hot" effect was what I wanted.
Check out the blog of unceasing fun, defiantworkshop.blogspot.com!
-
11-19-2015, 11:03 AM #10Veteran-Sergeant
- Join Date
- Aug 2014
- Posts
- 150
Started out painting the fire on the columns by taping the flames down to a ruler and priming them in black. In retrospect, I should've done it in white, but I was priming the whole kit at once and got into a rhythm.

From there, I painted the skulls as you'd normally paint GW bone colors. Its important to prepaint here so the effects when sprayed reflect onto the skull, giving it a sense of light emanating from the fire. I can be a little sloppy here, because the fire effects next will cover a lot of mistakes.

After that, just started with Tamiya paints, airbrushing starting with white at the bottom to black at the top, and the "fire" range in between. I made sure to get a little yellow on the tops of the skulls, and the very slightest possible hint of orange on the brows to give them a little glow. I interspersed some black here and there, not just at the top, to keep the flames looking smokey.

Finally, I put some more black lava paste on the bases of the fire. Every completed version of this kit I've seen has blank black bases, and that just won't do. The texture paint gives an ashy effect, and when drybrushed with a copper metallic, actually looks like glowing embers:

One more mock build up before bed and an off day on Friday, means I am hoping against hope to finish this sooner rather than later! Painting all of the dragons and trim is up next, and its quite a daunting task. Thanks for looking!!!
 Check out the blog of unceasing fun, defiantworkshop.blogspot.com!


 Reply With Quote


